Menu

Shop

Garage

Cart

Account

Products to Compare (max of 3)
X
Compare These Parts

Rear Axle Assembly - 410 Sprint Car Build

7/24/2019
Add Article To List

On this episode of the 410 Sprint Car Build series, we will install the brakes on the rear end, cut the torque tube, and install the bell housing.

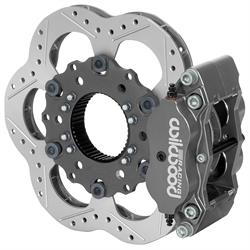
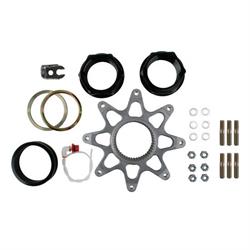
To start, we need to put the caliper mount on the rear end. We are using steel bolts because they handle the heat better than titanium bolts do. The rotor we’re using also helps with heat dissipation at high RPM's. It has sliders that cater to the swelling and expansion that occurs during a race. This style of rotor is also very easy to mount. To mount the rotor, first, mount the bracket on the axle by aligning the splines. Then, slide the rotor on the axle and make sure the center of the rotor lines up with the center of the caliper. Then, put the safety wires in their proper positions around the bolts so everything is secure.

After the rotor is installed, we put in the torque tube studs. There are two separate holes in case you get into a crash and one ripes out, you can rotate and use another set.

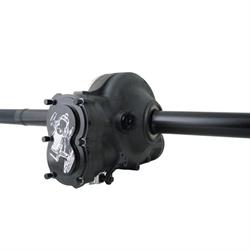
Next, we’re working with our Winters Shifter that comes with a quick-release ball. Then, we’re putting in the breather that comes in our rear end accessory package. It has a floating fitting that allows you to move it where you want. The last thing we are going to install on the car is the bell housing.

Using a bandsaw, we cut the torque tube to the correct length. It’s a 40-inch car so we’re cutting all the torque tubes to 26 and ¼. Next is the drive shaft. It has a different spline on each end and the courser side goes in the rear end. They come 30 inches long and need to be cut to 29 and ¼. After we get the right length, we use a lathe to remove the burrs and make it as easy as possible to slide it into the rear end. If you don’t have a lathe, a chop saw or a bandsaw will also do the job.

Thanks for following along with our build! Next time we will be installing the rear end. You won’t want to miss it!

Products Featured in this Article

Related Articles

Brakes - 410 Sprint Car Build
by Speedway Tech Team - Posted in Tech
8/28/2019
Check out the 410 sprint car brake installation and bleeding the brakes! We're making serious progress on our build.
Wheels and Tires - 410 Sprint Car Build
9/9/2019
We’re putting Weld Racing Wheels and tires on our 410 Sprint Car and finally dropping it on the ground. Check it out!
Shocks - 410 Sprint Car
by Speedway Tech Team - Posted in Tech
9/6/2019
Today, we're following along as Jason Martin builds the Pro Shocks for our sprint car and installs them. There's lots to learn from this episode!
Rear Axle Installation - 410 Sprint Car Build
by Speedway Tech Team - Posted in Tech
7/24/2019
Check out our 6th episode of the 410 Sprint Car Build series. Last time we assembled the rear axle and now we are installing it!
Seat Installation - 410 Sprint Car Build
7/17/2019
Check out the process of installing the full containment seat and seatbelts in episode 4 of the 410 Sprint Car Build series.
Steering/Gauges - 410 Sprint Car Build
by Speedway Tech Team - Posted in Tech
7/10/2019
Today, the power steering gear and gauges are being installed on our 410 Sprint Car Build by team Fricke.
Engine Build and Dyno - 410 Sprint Car Build
by Joe McCollough - Posted in Videos
1/15/2021
Our sprint car is back, and it's ready for some power. Follow along as Speedway Motors Racing Engines puts together a thundering 410.
Front Axle Assembly - 410 Sprint Car Build
by Speedway Tech Team - Posted in Tech
8/12/2019
Today on our 410 sprint car, the guys are assembling the front axle. The process can be a bit messy, but the finished product is so worth it!
Brake Lines/Motorplate Installation - 410 Sprint Car Build
7/5/2019
Learn how to install the floor plan, brake lines, and motorplate in a 410 sprint car as we launch our 410 Sprint Car Build.
Wings Install - 410 Sprint Car Build
by Speedway Tech Team - Posted in Tech
9/25/2019
Watch as we put the wings on our 410 Sprint Car. We complete our build with nose and top wing, sideboards, and bumpers. Learn about the install in our video.