How to Check Piston to Valve Clearance
Interference is never a good thing, whether it's in football, while watching tv, or listening to the radio. It's an inconvenience and is almost always unwanted. None is more important to a car enthusiast than piston-to-valve interference. A miscalculation can result in utter catastrophe, and nearly every car enthusiast can tell a story about someone whose piston has missed a valve. To help prevent this disaster of magnificent proportions, I’m going to walk through the steps on how to check your piston to valve clearance and show you some tools that Speedway Motors offers to make it easier.
Now, I’m going to go over a more dynamic way of checking. You can do a much more in-depth procedure for those who are so inclined, or those situations where every hundred-thousandth matters. However, for the nitty-gritty folks who just want to make sure the new cam they got clears or want to see what they have to work with currently, this is for you.
Firstly, let's go over some specs. Typically you want a minimum of .080 of an inch of clearance on the intake valve and a minimum of .100 of an inch of clearance on the exhaust. Since the exhaust runs hotter, there’s more thermal expansion and therefore needs more room. I would never suggest going below these specs as they could cause issues, especially at high RPM, as there is potential for the valve to float. This reiterates that selecting the correct valve spring is important for your engine's usage; that way, this will be avoided as much as possible.
Next, to get an accurate reading, you will need to make sure all your engine's components are in good shape: no sloppy timing chains, no worn valve guides, loose rockers, bent pushrods, everything needs to be in proper working order. If any of these components were bad, they could throw off the reading and potentially cause piston to valve interference, damaging the valves and ruining lots of hard work and money and causing some serious frustration. To make sure my reading was accurate, I purchase a new Timing Chain for my application. This kit also allows you to advance or retard the cam timing by 2 degrees. Sometimes a kit like this is necessary to move your cam timing back to spec.
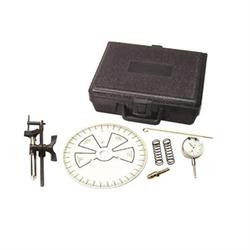
The second tool I bought was a basic Degree Wheel Kit. These are very nice for the price and give you some springs to keep tension and allow the system to work like normal, but they can easily be collapsed. It also provides a head-mounted dial indicator, so you can track how far the valve is traveling, as well as your basic degree wheel and piston stop. Another important tool can be found at almost any store you venture into playdoh. Color isn’t too important, but black should be avoided if possible. The necessity of playdoh will be explained later. One could also use modeling clay if wanted. Lastly, I grabbed 2 Solid Lifters to use for the cylinder I was testing, as I want to avoid the possibility of the hydraulic lifters collapsing under pressure.
The first thing I did was install the camshaft into the block. The bottom end had been reassembled. I made sure to liberally apply some Lithium Grease onto the Camshaft , then I installed the cam thrust plate and put on the timing gears and chain.
I lined up my markers on the gears, keeping the crank gear at zero advance. After installing, I also greased up the 2 lifters and installed them into the lifter bores for cylinder 1. Now comes the odd part. I like using Playdoh, as it's cheap and easy to find. I take about a half-dollar sized ball of Playdoh and spread it around the top of the piston for cylinder 1, making sure to cover the side opposite the valves very thoroughly. I typically will rotate the engine around once to make sure that the Playdoh doesn’t drag on the cylinder wall or get caught and smear inside the cylinder. That’s just not a mess I want to clean up.
After rotating the engine back to TDC for cylinder 1, I get ready to install the head. I typically like to use the head gasket here, as cold compressing the gasket without any sort of heat cycle will not harm it, and it can be reused in this circumstance. I then liberally lube the valves in the head and install the weak springs included in the basic degree wheel kit. I then put the head on like normal and torque the head down using the manufacturer-specified torque specs, making sure to lube the underside of the head bolts, as well as the threads to get an accurate torque reading.
I installed the factory length pushrods, but this would be a great opportunity to easily find the correct length pushrods for your setup with a Pushrod Length Checker. I then installed the rockers and tighten down until there was roughly .016 of an inch of clearance between the rocker and the valve tip. These are Ford’s specs for a solid lifter application your manufacturer may vary. Then, all I did was rotate the engine around a full revolution and pull everything back apart and remove the head. (If you can’t fully rotate the engine around DO NOT FORCE IT! This could cause damage to any number of parts on your engine. Simply rotate the engine back and disassemble and thoroughly inspect as to where your interference is.)
You can see the indentations left by the valves in the Playdoh. This will show you your piston to valve clearance. It is usually suggested to cut the Playdoh with a razor blade in the deepest portion of the indentation. Then you can take a pair of calipers and get a reasonably accurate measurement of how much room you have.
Remember, you want to be within the specs given earlier if you are, then everything is good to go. Disassemble and thoroughly clean all the parts used and prep for the reassembly of your engine. Now, like I said, this is very nitty-gritty. It’s a simple, yet fairly accurate way of doing it, and for my particular rebuild, that’s all I needed. You can take it much further and get absolute pinpoint accuracy, and this would always be suggested given you have the time, money, and tools necessary. As always, if you do have any additional questions, you can always contact the wonder Tech Team here at Speedway Motors on our hotline. Or check out some more articles here in the Toolbox.