Project Chevelle: Coilovers Tech Article
When the Rocket Wheels and big tires were bolted up on Project Chevelle, we rounded a corner from wimpy stocker to tough muscle car. This immediately made us want to take it to the next level with a lowered stance. With the G-Comp dropped spindles and Speedway disc brake kit finally installed, we couldn't wait to get it on the ground and see the fruits of our labor. The jack-stands came out, the car hit the ground, and we were thrilled with the much lower ride height in the front. We were less thrilled by the now tail-high, stinkbug stance. It was clear that the rear needed to come down. And wouldn't it be great if we could fine-tune the ride height in the front? It was time for coilovers.
When we say "coilover," images of high-dollar, pro-touring suspension systems may come to mind. You may also assume that this luxury is out of reach for a budget builder, but that's not the case. Let's assume you want to drop your car the old fashioned way using lowering springs. We offer an Eibach kit that includes springs and shocks for $706.99. This is a fine kit, but keep in mind that it uses a non-adjustable shock and there's no way to tune the ride height. In comparison, the fully adjustable QA1 kit that we're installing here is $459.99 for the front and 554.99 for the rear. Granted, that's about $300 more than the alternative, but we believe it's well worth it. Not only is the ride height infinitely and easily adjustable, so is the shock valving. Additionally, installation is straightforward and can be accomplished in a day. Follow along as we install the kit and dial in the ride height once and for all.
The first step in any project like this is to make sure the car is sitting squarely on jack stands. It's hard to overstate the importance of this step. Once this was taken care of, we set about removing the stock springs and shocks. In the rear, this is a very simple process. Once the shocks are off, a jack under the rear axle will allow the housing to lower enough that the springs will literally fall out.
In front, things aren't quite so simple. The shock comes out easily enough, but the spring needs to be wrestled out carefully to avoid a serious incident should the compressed spring be given room to run. If you've been following along, we go into detail on this process in the spindle and control arm episode. In short, a spring compressor and floor jack were both in place before we even thought about breaking the ball joint. This is about the only option if the spring needs to leave the building intact. This time around, we're replacing the stock springs with coilovers, so we can be a little more destructive. Out came the cutting torch, and the saggy old stockers came out in several pieces. In spite of the crudity of this process, you'll notice that we used some scraps of aluminum sheet to protect the rest of the suspension components from the molten metal shower. Once the springs are out, the ball joint can be disassembled without the drama of a preloaded spring mere inches away.
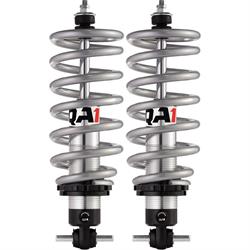
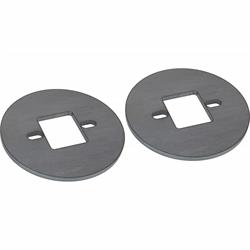
Now for the fun part; installing the shiny new coilovers. We pre-assembled these using the QA1 thrust bearing kit and anti-seize on the threads and bearings. Both of these steps will make it much easier to adjust the height of the car when installed. In the front, the coilover bolts in place just as the stock shock did. The top of the spring sits in the pocket on the frame just as the original, but the bottom mounts to the shock body instead of nesting into the control arm. This means that the weight of the car is being supported by the lower shock mount on the control arm. This is fine on a stock arm, but the tubular arms look a little thin in this area. For a little added insurance, Speedway offers a reinforcement plate to help spread that weight out across the spring pocket. Installation requires a little grinding on the control arm to remove the welded-on nuts. Once these are gone, the plates just drop in and are secured by the bolts through the shock.
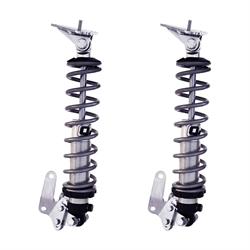
Installation of the rear kit is pretty straightforward, and the instructions provided by QA1 are very thorough and easy to follow. Both the upper and lower brackets require that additional holes be drilled, but they index off of factory holes so no measuring is required. Even the nuts and bolts are included to save a few trips to the hardware store.
It's also worth noting the spring rates that we selected. 450 pound springs were chosen at the front, and 175's in the rear. We were initially concerned that the rears would be too light, but on the road they seem to be just right.
In the end, two of us installed the front and rear kit in a morning. At lunchtime, Project Chevelle was back on the ground. A few tweaks to the stance were made using a spanner to turn the big nut on the shock body. Remember those bearings and anti-seize? You'll thank yourself right about now as you crank on the adjuster. It took us a little while to get the stance exactly where we wanted it, but we were thrilled that we could actually raise and lower the car as we wanted.
Once the ride height was set, the Chevelle made a trip to the alignment shop. With that out of the way, our next move was to adjust the shocks. Remember that valving adjustment? The QA1's have one knob that adjusts both compression and rebound. There are 18 clicks between full-hard and full-soft, and the difference is dramatic. We started out with the knob all the way in, and the ride was pretty harsh. Undoubtedly, this will be a killer setup when we repeat our parking lot autocross, but for driving around town it's a bit much. The sweet spot seems to be at around 50 percent, or 9 clicks in. This yields a very pleasant compromise between tooth-rattling stiffness and squishy compliance.
Behind the wheel, we're finally able to feel the benefit of the frontend geometry improvements. We can blast down freeway on-ramps in second gear at full throttle with minimal body roll. Around town, the ride is firm but not jarring. That extra money spent on the adjustable shocks has proven to be well worth it.
In the end, the stance makes the car, and this one looks pretty great if you ask us. It's come a long way from a nose-high stocker wearing steel wheels and whitewalls. The transformation in performance is equally dramatic. Now if only we had a little more horsepower...