Project Chevelle: 383 Part Two + Transmission Tech Article
At last check, Project Chevelle was sitting helplessly, waiting for us to get back to work and complete the engine swap that we had started by yanking the old 307. For what was most likely the first time in its 46 years, our '72 Chevelle was not drivable by anyone other than Fred Flintstone. It looked sad.
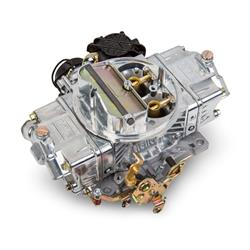
Don't worry old friend, we're going to make this right. We've plucked a hot 383 from our shelves, dyno tested it, and detailed it to look like never got over 1972. We were able to harvest the original alternator brackets, reuse the power steering pump and brackets, and hook up the original throttle cable to the new Holley carburetor. We even reused the original coil bracket. All of this adds up to an engine bay that could make you believe that the Chevelle came from the factory with this hopped-up small block.
So now that we've tripled the power, we're not about to attempt to bang gears with the worn out column shifter. On top of that, the little 3-speed might be a bit iffy at handling all that torque. And there's no overdrive. You can see where this is going. Time for a Tremec 5-speed.
This transmission makes sense for a lot of reasons. First, TKO600's are proven to stand up to some power and abuse. We've used them in race cars that push their 600 ft./lb. rating right up to the edge and have had very good luck with them. Shifts are very positive, and let's not forget that tall 0.64:1 overdrive. We plan to drive the snot out of this car, and the gas-stretching top gear will help tremendously on road trips with that big Holley carburetor leading the way.
Speedway makes it easy to come up with everything needed for this swap. We offer a kit that includes the transmission, bellhousing, flywheel, clutch and pressure plate, hydraulic throwout bearing, even ARP bolts and the reverse-light harness. There are several different versions depending on horsepower and engine configuration. A one-piece rear main engine will use a different kit than a two-piece. There's yet another that includes a Magnum 6-speed that's good to 700 lb./ft.
With all the parts laid out in front of us, we set out to install the flywheel, clutch, and bellhousing on the engine before it was lowered into the car. Make sure to note the torque specs provided with the ARP fasteners when tightening the flywheel bolts and pressure plate bolts. Also, make sure the friction surfaces on the flywheel and pressure plate are clean. We like to wipe them with acetone on a clean paper shop towel.
With assembly complete and red threadlocker on all the bolts, it was time to set up the throwout bearing. There will be a measurement provided with the bearing for the amount of space between the bearing and clutch fingers. This spec is critical because this is what will ensure that the clutch engages and disengages fully without over-extending the throwout bearing. This is a relatively simple process, but you want to be sure of your measurements. A mistake can lead to your brand new transmission being pulled back out of the car. The old saying "measure twice, install the transmission once" applies here.
Speedway's Hydraulic Clutch Release Bearing Set-Up Tool will come in handy. Place the face marked "bellhousing" against the back of the bellhousing, then push the pin in until it touches the fingers on the pressure plate. Then, place the side marked "transmission" against the face of the transmission. Push the pin back in the other direction until it touches the face of the fully-retracted throwout bearing, and note the distance that the little rubber o-ring has moved. This is the distance that needs to be within the spec provided with the bearing. Seem confusing? We go into detail on the Project Chevelle transmission video.
Obviously, the hydraulic throwout bearing needs to take orders from someone. In this case, we chose a bolt-in pedal assembly from McLeod. Not only does the kit come with a remote-reservoir master cylinder and bracket, it also includes the pedal arm and pushrod to make it all work. A little trimming of the firewall and pedal bracket was necessary, but it's all hidden when the assembly is bolted in place.
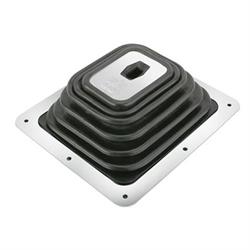
We test fit all of this using a plastic mock-up block before we installed the real hardware. This revealed to us that the transmission tunnel would need a little modification to clear our new 5-speed. Tremecs are more squared off on the top, so the arch-shaped tunnel in the Chevelle needed a little coercion. This can be done the old fashioned way with a ball-peen hammer, but we did it a little differently. First, we placed a large sandbag meant for shaping sheet metal over the top of the tunnel inside the car. Then, we stuck a planishing hammer die into an air chisel and stretched the metal easily and smoothly. We reluctantly cut a hole for the Hurst shifter, but were thrilled that it fit just exactly where it should be in front of the seat.
It's also worth noting that we were able to use the stock transmission crossmember, just slid to a different location with two new holes drilled in the frame rails. We offer fabricated crossmembers for these cars that increase exhaust clearance and look way more trick, but we're trying to keep this as budget friendly as possible.
Now for the fun part. The engine dropped in with little drama. Not surprising since it's basically a high-zoot version of the one we pulled out. Ditto the transmission, though a few love taps from the trusty dead-blow hammer were necessary to get the input shaft to slide all the way into the clutch and kevlar pilot bushing.
With everything bolted in place, we started to get pretty excited about driving our newly fortified muscle car. So why not set a ridiculous deadline to have it finished? in this case, our Customer Appreciation Day car show was a few days away, so we decided a thrash was in order to have the car ready for the show. This resulted in a few late nights in the shop finishing everything up and tying up loose ends. This included a fuel system swap that we'll go into in a future episode, a new driveshaft, and about a million other little things that always come up at the last minute.
But we did it. The Chevelle popped off through open headers in the middle of the night a day before our deadline. Our first drive was the morning of the show, and the difference was dramatic. The 383 is a torque monster, and a few little taps on the throttle made it clear that the right rear tire would have no chance of survival. And the looks on peoples faces as we rumbled and popped through the show to get to our spot made all the work worth it. We suddenly found ourselves in a real muscle car. Mission accomplished.
If you're paying attention, you may have noticed that we've strapped a big engine and bulletproof transmission in front of a stock 10-bolt and open differential. Good enough to drive across the parking lot, not so good for putting down power and staying together. We plan to address that in the near future. Look for more episodes and articles as we continue to prepare Project Chevelle for its first big road trip and a few other adventures!