How to Install Rear Brake Lines - 1967 Chevelle
Let’s pretend for a minute that you’re a dingbat. Not like, simply an absent-minded buffoon, but rather a total space-cadet. Now, in this frame of mind, you can relate a little to my feelings as I started to plumb the chassis. That was when I realized that I hadn’t welded any tabs on my rear end housing to secure brake lines or hoses. Since the point when that should’ve been done, the housing was powder coated and had been fully installed in the car. Everything but gear oil. Which reminds me, still needs to be filled.
What to do? I could use zip ties and just slap some line on. That sort of defeats the purpose of everything I’ve done to this point. Plus, that does nothing for retaining easy access to remove the calipers for gear-set changes.
The Wilwood dynalite calipers are arranged in a fixed-mount, meaning they don’t float when the brake is applied or as the pads wear. This means that they could be plumbed to just a typical wheel cylinder. A 3/16” steel line screwed into an adapter to mate it to the 1/8” NPT port on the back would work just fine. However, I have plans on implementing different gear sets in the 9”. That means bleeding the brakes after a gear swap if the calipers were hard-plumbed in. While not a huge deal, still not a shortcoming that I want built-in on a car that is fairly well-thought-out.
Instead, I wanted the calipers to be fed by a braided hose that transitioned to steel hardline at the housing. Usually that is a piece of cake when you have a tab to secure that junction and a bendable tab to hold the middle of the hardline on the axle tube. While laying on a creeper starting at the situation I came up with a plan to swim out of the trouble I’d put myself in.
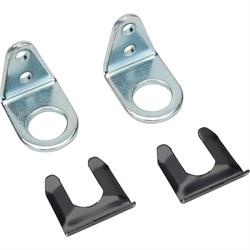
We sell these simple little bolt-on brake line tabs ostensibly for use on race cars and street rod front brake lines on cars that don’t have a tab for this purpose. Great. But where to fasten it? Originally, I thought about making a bracket to mount it underneath one of the T-Bolts for the axle retainer. After I had the brackets and flex lines in-hand and scale could be determined, the answer popped out to me.
There was a space on the lower trailing arm bracket that I could drill and tap for the small bolts that hold the bracket in place. This worked out to be the ideal spot to help solve the other problem of not having a retainer tab to secure the hardline to the housing as well.
Since the tab would be secured ahead of the centerline of the rear axle it would not require much of a bend in the hard line nor would the hard line need to extend up and over the housing. This created a situation where the steel line would have pretty solid support from both ends with a relatively short unsupported span in the middle.
To supply juice to the steel lines across the housing I picked a universal rubber line with equally angled IFF ports and a loop for mounting. I built a simple steel bracket that bolted under one of the third-member nuts and fastened the tee solidly at the 1 ‘o-clock position on the face of the rear end.
With the pickup points defined, I went to work bending and flaring 3/16” line to connect the dots. At the calipers, I used a 90-degree fitting that also converted the pipe fitting on the calipers to an AN3 male. At the tabs, another conversion fitting transitioned the hard line flare to an AN3 male as well. This fitting also incorporates a groove and shoulder for securing to the tab with a spring clip.
The braided stainless hose is just long enough to connect with a graceful curve and stay out of the way of all the moving parts that could prove fatal to it.
The only issue remaining to solve was how to support the hard line against the housing to keep it from vibrating and causing a fracture at one of the flares. Which is usually the payoff for an unsupported, steel flared line.
I used a product that we’ve had for several years and has become quite popular in all of it’s varieties. The Mag Daddy, if you’re not familiar with it, is a very powerful neodinium magnet with various holding capabilities affixed to the face side. The particular one I went with was made to secure a wire or cable to it with a zip tie.
Sue me. I used two zip ties (with the Mag Daddies) to find the place with the most movement on the hard lines and pin them each down. As it worked out, those spots were right at the transition on the housing from the fabricated center bulge to the axle tube. Can you see the one in the first photo? No? Good. Mission accomplished.