Routing Front Brake Lines - 1967 Chevelle
When last you saw the saga of the brake lines I had walked you through the creation of master cylinder lines and had given you a glimpse of the funky factory routing of the front chassis line. In most cases, I like to simplify things and clean them up visually when I can. In this case, however, I was a little uncertain why the General chose to loop and swoop that steel line all around as it made its way from left to right. That’s what led me to replicate that routing as best I could.
I had a suspicion that it had a lot to do with the tight fit a big block can be in places and limited options for exhaust routing. This instinct turned out to be correct in more ways than one. I was also not willing to bet that my way was better only to find out at a later stage that the lines needed to be redone and moved. Leaving holes where hold downs were and having to work around an engine and exhaust system in the way.
Here’s a refresher on the goofy path this line takes. My lines were routed in this same manner. I used rhino coated 3/16” steel line which is a dark grey color and blended away nicely against the black of the frame. This coating rust proofs the steel line and is very easy to work with.
In the places that is seemed like the line needed some support and that I could get to with a drill bit, I used our single line stainless clamps to secure the line to the frame. I drilled under-sized holes and actually tapped them to receive a #8 button head machine screw. The frame material is plenty thick to handle this task and it makes for a very clean and serviceable installation.
Some of the bends required were quite tight. Tighter than my handy old tubing bender could muster. I picked up the Titan mini-bender for just this task. The bender is much smaller than the typical tool and it makes bends on a 1” radius. Perfect for the task of the many sudden direction changes this job required.
Once I was satisfied with the routing, I terminated the right side of this line at the adapter fitting that clips into the factory GM brake hose tab. I’d already stripped and repainted the tabs and installed them on the frame with the adapters installed. This allowed me to take accurate measurements for where the new flare was to be made and kept me from trying to press the spring clip onto the fitting on the freshly painted frame. After measuring carefully, I cut the line where I needed the flare and used the Titan hand-held flare tool.
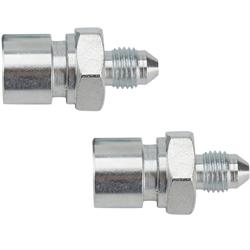
If you’re using aftermarket performance calipers, you’ll likely need to adapt the port on the caliper body to something that speaks your brake system’s language. My quickest route to a common denominator was to get both the steel line and the calipers pipe thread to a 3AN line. The nice thing about pipe fittings is that they’re fairly easy to adapt and work with. The bad thing about pipe fittings is that they’re a little like a blackjack game, especially when working with fixed 90 or 45-degree fittings.
Take your time and plan ahead. You’re not going to back off a pipe fitting (very far) to point in the direction you want before it leaks. That’s because pipe threads are tapered. The farther you turn them in, the bigger the thread diameter gets, that’s what helps them seal. It also grows the female threaded portion of the union slightly, every time a pipe thread is cycled. The moral of the story is, thread pipe fittings in by hand and tighten judiciously as you approach the desired angle.
While I’m on the topic of pipe threads, I feel the need to clarify. Pipe threads are the only kind of plumbing union you’ll find on a vehicle that requires the use of Teflon tape or sealant. You wouldn’t believe the number of times I see pipe dope, aviation sealer or Teflon tape on inverted flare fittings. The flare seals these unions, as does the flare on AN fittings. The fittings on fuel, power steering, and air conditioning systems have either a compression, flare or o-ring type seal. Sealing the threads on these types of connections does literally nothing. Okay, end of that rant.
I elected to point my 90-degree elbows down, this put the chassis and the caliper on the same playing field and allowed the stainless line to make a graceful arc that didn’t bend or stretch when turned from lock to lock.