Wilwood Rear Brake Assembly Guide - 1967 Chevelle
While in the process of mocking up the rear end housing and testing for wheel fit, I had my shiny new (then) brake kit out of the package and had dry-assembled one side of it. This extra precaution was taken due to two factors. The narrowed rear end housing and my stubborn insistence on running a 15”x10” rear wheel under the rear.
In the end, I want the tone of the Chevelle to be that of understated simplicity. Something that hides its true performance under a more timid exterior. To speak softly and carry a big stick. My thoughts on accomplishing this include a set of black steel wheels with redline tires and dog-dish caps. On the other hand, I also wanted to reap the performance of the biggest brakes and best handling suspension I could afford and hide under such a monochromatic exterior. This leaves the eventual option open to fit the car with a flashier set of wheels in 18” or 20” diameter and still look completely at home and correctly equipped.
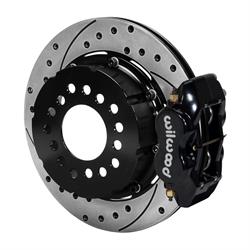
That’s what drove me to the 12.19” rotor size Wilwood Kits. They are compatible with “some” 15” wheels and are large enough to both handle my braking needs and look great through an open-wheel design.
As far as the “most” 15” wheels caveat, I ended up batting 500. The rears after assembled initially and checked with modeling clay were perfect. The fronts, I’ll address in another article.
Assembling the Wilwood kit was very easy and systematic. Follow the instructions and you’ll begin to see the genius in the design and utility of a brake company with decades of experience. A few things that I want to be sure to note that may be in addition to the instructions provided.
You’ll notice that almost all fasteners provided with this kit are drilled for safety wire. I took the fact that if in a race environment, you’d want those fasteners positively locked in place, as a guide. Any hardware that I thought would be extra un-good to come loose got a little dab of red Loctite before final assembly and torque.
Will this make them difficult to remove later? Yes. In fact, that’s the point.
I spoke earlier about the critical clearance for the outer axle components on this car. This became very evident as I did the final assembly on the brake components. The clearance between the coil-over and the caliper was less than a half-inch. Some hardware was difficult to get where it needed to be and proved to be a little challenging to access for tightening.
Speedy Bill used to say, “If it was easy, everyone would do it.”
Overall, the combo of narrowed housing, wide wheels, and almost too big brakes all worked perfectly together. As the saying goes, a place for everything and everything in its place.