Menu

Shop

Garage

Cart

Account

Products to Compare (max of 3)
X
Compare These Parts

Prepping Control Arms for Coil-Overs - 1967 Chevelle

3/2/2020
Add Article To List

As promised, this article dovetails off the end of the control arm article. Since these two projects were done concurrently, now seems like a good time to cover the process of prepping these arms for use with coil-overs.

Normally the front shock absorber mounts from below the control arm with bolts that tread into a speed nut or welded nut (in this case) on the lower control arm. When you change that shock absorbers work load to also include supporting the weight of the vehicle, which requires that you place that load on top of the control arm in order for the load to transfer to the arm via direct contact rather than through the tensile load on the bolts. Below, I’ll detail the steps that I took to ensure this conversion would perform and last.

Sometimes, you feel like a nut, sometimes you don’t.

I drilled out the old nuts as best as I could with a step drill, ensuring that I didn’t open up the holes in the control arm any larger than the newly required 3/8”. Then I was able to break away most of the remaining nuts with lineman’s pliers to leave just the welds to be ground. I ground and smoothed away the welds with a cutoff wheel on my angle grinder.

Since the new hardware supplied with the QA1 coilovers upgraded these fasteners to 3/8” fine thread, I drilled those holes to the new dimension after grinding was complete.

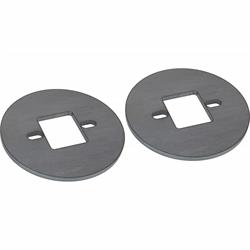
This led me to a new concern. The way that the “top hat” for the lower shock mount is designed leaves a large, unsupported area directly under where the cross-bar of the coil-over will rest. Given the punishment that a big block, plus air conditioning, plus aggressive driving will give, I decided to try and come up with a way to beef this area up.

What I came up with is this. Now sold under part #910-3610, this reinforcement plate sandwiches between the coil-over lower mount and the mounting pad on the arm. This plate takes the load and spreads it across the entire top-hat area and being over-sized also provides a block-off plate for the now unused coil spring pocket. Which may otherwise collect debris.

With prototype parts in hand I assembled the coil-overs per the instructions provided by QA1. I opted to add the Torrington bearing kit as well to aid in future ride height adjustments.

During installation I noted that the increased thickness of the plates caused the bolts not to protrude far enough into the nylock nuts to actually engage the locking ring. I chose to source new bolts that are .25” longer to ensure good engagement.

Something else that I’ve found essential to happy life with coil-overs, is the liberal application of anti-seize to the aluminum threads on the body of the shock. This will pay dividends down the road when you want to make adjustments to your setup.

All in all, this was a very productive upgrade and went a long way toward my goal of getting the car back down on the ground and on four wheels again.

All-new grade 8, fine thread hardware with nylock nuts was used throughout.

Products Featured in this Article

Related Articles

Replacing Front Control Arms - 1967 Chevelle
by Jeff Karls - Posted in Street
2/24/2020
Next up is the suspension on Jeff's 1967 Chevelle project. Learn how to properly disassemble and remove components, such as the spindles and brakes. See tips on replacing the control arm bushings and using the right tools to get the job done.
How Big of Tires Can I Fit - Plus Sizing Guide
by Mark Houlahan - Posted in Tech
3/7/2023
Changing your tire’s profile, be it width, height, or both, can provide increased traction, braking, and handling. Learn more in our guide.
Mopar Flexplate Identification Guide
by Mark Houlahan - Posted in Tech
1/25/2023
Determining the correct flexplate for your V8 Mopar-powered project takes a little understanding of how these engines were balanced. Our Mopar flexplate buyer’s guide will help.
Ford Flexplate Identification Guide
by Mark Houlahan - Posted in Tech
1/13/2023
Ford’s small block and big block engine families have their share of flexplate differences. We’ll show you what to look for in this buyer’s guide.
LS Engine Flexplate Fitment Guide
by Mark Houlahan - Posted in Videos
1/11/2023
The LS swap is no doubt still going strong, but if you’re planning to run an automatic behind your 4.8, 5.3, or 6.0L LS-powered ride, you’ll need to pay attention to a few items we discuss in this buyer’s guide.
Small Block and Big Block Chevy Engine Flexplate Guide
by Mark Houlahan - Posted in Tech
1/11/2023
Over several generations of small block Chevy (and big block Chevy) engines there have been several changes that dictate what flexplate works with them. We’ll help you determine the correct flexplate for your Chevy engine in this buyer’s guide.
Why Convert to A One Wire Alternator
by Mark Houlahan - Posted in Tech
12/29/2022
Learn how to hook up a 1-wire alternator on your vehicle. 1-wire alternators are perfect for engine swaps or just keeping things simple for your project.
What You Need to Know About Flexplates
by Mark Houlahan - Posted in Tech
12/27/2022
The engine’s flexplate is a critical part to transferring power to your drivetrain. Using the correct part is imperative to engine longevity and proper drivetrain assembly.
Ammeter vs Voltmeter: How They Work, and Which One Is Right for Your Car
by Mark Houlahan - Posted in Tech
12/21/2022
Ammeters and voltmeters are two very different ways of monitoring your vehicle’s charging system. Both are better than an “idiot light” but which one is right for your build?
1967-1972 Chevy C10 Pickup Lowering Guide
by Mark Houlahan - Posted in Tech
12/19/2022
From a mild leveling to slammed and “in the weeds” there are several options to lowering a C10. We discuss the options in our ’67-’72 C10 lowering guide.
Error
X
Note
X
Ok