Steering Installation - 1967 Chevelle
In my quest to get the Chevelle on the ground again I suppose I would be remiss to neglect to mention my little cheerleader and greatest critic. My son Max. He was a few months shy of three when I was at this stage of the project. In his inimitable way, Max had dubbed the Chevelle, “Daddy’s broken car".
About this time in the project I think we both must have been tired of looking at the poor naked carcass of body shell and frame. It was about this time where he started solemnly informing me, every day, “Dad, it doesn’t have any tires.”
It appeared as if Max’s new benchmark was perfectly aligned with my own goals for the project before winter time set in. After all, I had sent the removable body panels off to be acid-dipped and have the preliminary body work started. It was up to me to get the rest of the car mobile and stripped bare so that it could be worked over as well.
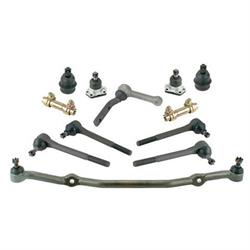
I’d already assembled the main componentry of the front suspension and the last remaining bits were the steering and steering arms. Being a huge fan of durable finishes, I sat on the fence for far too long trying to decide what to do with expendable items like the center link and tie rod ends. I wanted these parts to be finished nicely, but wasn’t sure of the feasibility or expense involved with trying to powder coat these parts. In the end, my friend at the powder coating shop talked me out of it due to the simple fact of how much of each part would need to be masked to ensure proper function and adjustability.
In the end I opted for a nice satin black finish to accompany the black powder coating that came stock on the steering arms and center link. This proved to be a nice contrast to the gloss black of the frame and suspension components.
After wiping everything down with lacquer thinner and a lint-free rag, I masked the tapered mating surfaces on all components and applied several dry coats.
After the pain was well-cured I assembled the individual components into 2 tie rod assemblies and sourced matching, zinc plated hardware. Sometimes commodity parts like chassis and suspension parts will contain varied hardware due to different production runs. Fine for replacement parts on a daily driver car, but I like to have everything uniform.
One tidbit that I can relay that might help with your project is the fact that you cannot install the idler arm and then expect to install the center link after. Due to the forward jutting “shelf” on the main cross member, it is physically and geometrically impossible to get the center link engaged into the pitman arm and idler arm within the confines allowed by that area of the cross member.
I had to remove the idler arm and mate it to the center link, engage the center link to the pitman arm and then swing the center link into position above the frame shelf. Which was a much more challenging way to install these freshly painted parts that I had anticipated. The worst part was getting the idler arm aligned again without gouging the paint on the frame rail. I’d like to tell you I was successful but that would be a lie.