Adjustable Proportioning Valve Block Installation
Benefit of Adjustable Proportioning Valve Block
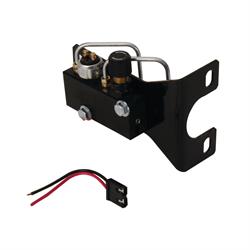
Nothing beats an adjustable proportioning block for a brake system. They're far superior to the factory-style metering valves that tend to stick and over-center with age. The Speedway Motors adjustable proportioning valve block, brake distribution system P/N 910-31367-BLK has it covered for you. I chose the black one for my 1976 Chevrolet Laguna S-3 because the car is going to have a blackout appearance, but the valve kit is available in a chrome finish as well under Speedway Motors P/N 910-31367-CHR.
The kit comes with all the following parts: Adjustable Brake Proportioning Valve with Brake Light Switch Mounting Bracket with Mounting Hardware Electrical Wiring Pigtail for Brake Light Switch Pre-Bent 3/8-24 thread 3/16” Brake Lines from Master Cylinder to Valve 5- 3/16” Inverted Flare Tube Nuts (for flaring your own 3/16” hard lines)
Mounting the Valve
When mounting the valve you'll want to mount it with the switch towards the front, and the adjustment knob towards the rear. Doing this will ensure that the adjustment knob will be on the left and easily accessible for making adjustments, and the port marked RO (rear output) will be facing towards the firewall.
The valve has a port marked FI (front Input) this port is located in front of the brake light switch, and on the Corvette style master cylinder the port for the front brakes will be the port located farthest from the master cylinder mounting tabs. The valve also has a port marked RI (rear Input) this port is located between the brake light switch, and the adjustment knob. On the Corvette style master cylinder the port for the rear brakes will be the port located closest to the master cylinder mounting tabs.
Managing the Lines
The pre-bent lines are slightly different in shape, so you'll need to mock them up to make sure they are connected to the correct ports. Be sure to use a flare nut wrench when tightening any brake lines to prevent rounding the nuts off or causing the line to kink. The clearance for the lines where they go into the valve can be a bit tight, so you may need to get a flare nut wrench that isn't as thick. Many of the higher-end wrenches are thinner in that area which makes tightening the lines easier.
Then all that is left is determining what type of lines, or hoses that you want to use from the valve to the rest of your brakes. The valve also has two ports marked FO (front outlet), two ports are provided if you need to run separate front brake lines, or if you're running a single line and using a TEE to split the front lines. When running a single line to the front brakes, you can use a 3/8-24 IFM (inverted flare male plug) to plug whichever port you're not using.
Notes on Brake Bleeding and Adjustment
Bleeding the brakes with an adjustable proportioning valve is an easy task, but you will need to follow a few steps to make things go smoothly. After bench bleeding the master cylinder, make sure the valve is all the way open allowing full pressure to the rear brakes (clockwise).
When adjusting your brake system, start off with the Valve all the way open so the rear brakes have full pressure. In a safe area start with some hard braking at about 30 MPH to see how the brakes are working, unfortunately there's not magic setting as every car is different, due to brake components, vehicle weight, balance, wheel and tire sizes. You'll want to have around 60-70% of the braking on the front, so adjust the Valve clockwise to increase rear brake pressure and counterclockwise to reduce rear brake pressure. When the Valve is properly adjusted you should have even braking front and rear with neither one locking up before the other. Once you have it adjusted, you won't need to make any further adjustments unless you change wheel and tire combinations or need to adjust the braking for competition driving on track day.