454 Big Block Chevy Radiator Install
Ever since I decided to put a 454 Big Block Chevy in my 1954 Bel Air, I've been dealing with keeping that beast cool utilizing a stock style 3 core down flow aluminum aftermarket radiator. On a nice cool day driving down the road, I was able to maintain a coolant temperature of 200 degrees. However, going from stop light to stop light the temp would slowly creep up and no amount of air flow would bring it back down.
I started with an engine driven fan and added a half round chrome fan shroud as a start. That didn't last very long as it just wasn't able to pull enough air through the radiator core. I then switched to a 16" electric fan mounted to the inside core of the radiator and set up as a puller fan. Most electric fans work more efficiently at pulling air than pushing air from the front of the radiator. You can average up to 20 percent less efficiency pushing air and having the fan mounted in front does block air flow when driving down the road. So, if you have clearance, the engine side is best for installation.
Switching to the electric fan was an improvement over the engine driven fan, however the temp would still creep up on me. Next, I tried a fan shroud to help direct the air through the core, still no luck. Even setting my shop fan in front of the radiator with the electric fan running, the temp still rose while sitting there idling. I changed timing settings, checked AFR ratios, tried it with and without a thermostat, and even drove the vehicle with the hood removed to see if under hood temperatures had an effect.
Everything I tried just seemed to prolong the inevitable temperature rise. So, it came down to capacity. I then made the decision to switch to a Double Pass Cross Flow Aluminum Radiator, Speedway Motors part number 917-340. Just as the product name states, the coolant makes two passes through the core of the radiator before re-entering the engine. This allows a 5 to 20 degree coolant temperature drop over a standard single pass radiator. This radiator is available in 22, 24, 26, 28 and 31 inches wide to fit a multitude of different vehicles, and they all are 19 inches high overall.
Of course I chose the 31” wide in order to get the most coolant capacity. I also paired this radiator with a Cooling Components Style 80 Electric Fan and shroud combo, Speedway Motors part number 910-15682. These fans are rated at 2500 CFM and are among the thinnest on the market, and the Style 80 version fit the core perfect without any trimming of the shroud. With this fan you will need to use a 70 Amp Relay and Plug to handle the initial power up, part number 910-50051, from American Autowire. Now all I had to do is completely rebuild a core support to go from a down flow radiator to a cross flow. Easy right!?
To start, I drained the coolant from existing radiator and removed it along with my external transmission cooler. (1, 2, 3) I also had to re-locate the battery since the new radiator is 31” wide. Just not enough room to keep it in the stock location. (4)
Next, I unbolted the existing U-shaped radiator support. This would be the foundation for building my new support. I used a grinder with a metal cutoff wheel to remove both uprights from the “U”. This gave me a flat base to build off of that bolts into the stock location.
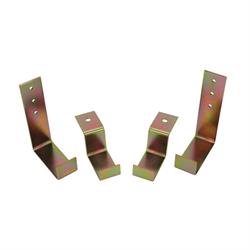
I measured and marked the two upper legs that tie the radiator support to the front fenders, which I cut 1 ½” from the middle and welded the L portion that hangs down back on. I bolted them back onto the fender and trimmed the excess sheet metal on the front to open the area up. I dropped a plum bob straight down and measured how wide I needed the bottom support to be. I then welded a ¼” flat piece of straight iron to the base and also welded Speedway Motors Radiator Mounting Bracket, part number 917-34700, to the flat plate to hold the lower radiator tank in place.
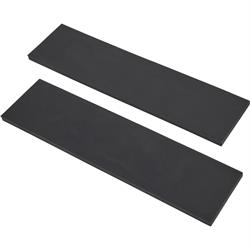
Also, don’t forget to add Radiator Rubber Pads, part number 917-34710, for dampening vibrations and eliminating metal to aluminum contact. With the base in place I used 1” square tubing to connect the top legs with the bottom support. I welded the tubing to the base and drilled new holes up top to bolt to the legs I modified earlier. This allowed me to unbolt and remove the new support if need be.
A coat of black paint and I bolted the new support in and test fit the radiator and began mocking up a top strap to secure it all in place. I had some 1/8” thick and 1” wide strap steel that I used to bolt to the top of the legs and bolt to the top lip of the radiator. A little more cutting and welding and I had a top strap that I could bolt in. This also held it firmly in place and allows unbolting the top for removal. I used the shroud of the fan as an isolator between the steel and aluminum. Next up I would have to deal with some radiator hose configuration and mount the transmission cooler. Be sure to check Speedway Motors Tool Box for another article on that.