A Guide to Installing Adjustable LS Motor Mounts
LS swaps are becoming a norm in the muscle car world nowadays. There are numerous combinations of motors, transmissions, headers, and other components that all must fit in the allotted space and having the ability to be able to adjust the engine's position front to back is a very nice concept.
I originally LS swapped my '69 Chevelle back in 2010 and used a set of fixed position LS motor mount adapters, which simply bolted on my block and allowed me to reinstall the poly mounts I was using with the bi block Chevy that was in the car when I purchased it. I went with a set that placed the engine in the stock location so I would not have to modify my transmission crossmember.
These Hooker adapters were the original adapters that were on my car, Speedway Motors PN 91618021.
Fast forward to 2015, I installed a supercharger, which required a different set of adapters that moved the engine forward 1-1/4-inches to clear the supercharger's rear pulley. This set of adapters shares the bottom hole of the factory style engine mount and the lower LS bolt hole. This is a good way to distinguish the adapters apart if you had a set and didn’t know what configuration they were. I installed these Hooker adapters that Speedway Motors sells as PN 91618019.
In 2020, I decided to install a non-supercharged engine so I didn’t need the rear room anymore and also installed new stainless headers, which required my engine to go back to the stock location again. I decided to go with the adjustable engine mounts that Speedway Motors sells so I could dial the engine location exactly where I wanted it. These adjustable mounts come with all required hardware and are made really well. The install was pretty straight forward and didn’t take long.
Adjustable Engine Mount Install
- Use a transmission jack if working on a lift or a floor jack if working on the floor and remove the weight of the engine from the mounts so you can remove the two long engine mount bolts that hold the engine mount to the frame mount. Here is a photo (above) of the engine mount bolt removed.
- Once the two long bolts are removed you can remove the stock 3-bolt mounts by removing the 3/8-16 bolts with a 9/16-inch wrench or socket.
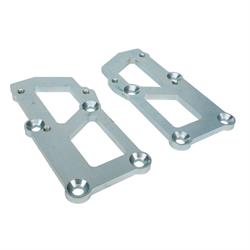
- Once the three engine mount bolts are removed, simply jack up the engine high enough to slip the mount out of the way so you can access the mount holes for your LS adapter mounts. These mounts have two large carriage style bolts that can slide back and forth on slots in the plates, which gives you the ability to adjust the engine back and forth. I used these Adjustable LS engine mounts, Speedway Motors PN 9104870.
- The new mounts come with instructions that are easy to follow. Once the mounts are bolted to the block and the engine is sitting back on the mounts reinstall the two long engine mount bolts back in place and tighten. You can leave the large lock nuts on the carriage bolts in the slot slightly loose and slide your engine to the position you want, then tighten the large lock nuts and you are done. Below is a photo of the mounts in place and the lock nuts ready to tighten down to finish up the install.