The Day We Added a Little Pizazz
If you’ve ever worked with fiberglass before you’ll understand me when I say &%$#@ fiberglass. The shards in your arms. The ‘movability’ of pieces. Heavy sigh. But who can complain when it’s so much more wonderfully affordable?!
This entire project started because we’d talked about making fenders for our favorite T Bucket kit for years. When discussing launching it – we talked about wanting to build one for shows – but who would do it? In walk five crazy girls. Talking about a crazy project. And even crazier? Our marketing director said yes.
Then came funny head shot photos. And talks and dreams about how we’d blog through the progress. Laughing over possible group names. And work with the fiberglass plant to get molds made from the original steel fenders. And then the actual fiberglass poured. And then doubling the thickness and pouring again.
It’s an incredible feeling to realize that you’re so close to meeting the deadline for something that you’ve worked so hard for. All that stands in your way is eight pieces of fiberglass that have to delicately and precisely fit together.
Ha! It’s enough to make anyone punch drunk enough to find putting sticker leftovers and a table cloth on and running around the shop as bat girl hilarious.
After sweat, probably a hidden tear or two, and some serious power tools – we created what we’re fondly referring to as ‘The Bucket Beauties Tried and True Guidelines for Installing Fenders on a T Bucket.’ Otherwise known as, the directions:
- Buy Fenders. Ha.
- Pre-painting, you’ll want to fit these to your body. You’re going to need the hardware set the fender kit comes with, a buddy and a whole boat load of clamps.
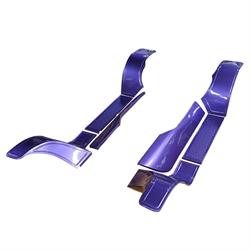
- Start by attaching the brackets to the frame. You’ll need to drill and tap the mounting holes for them. One secures onto the truck bed. One onto the front frame, two near the body. One of the body brackets is VERY secure and will become your step plate. Heads up, it’s a climb in and out of the bucket that is difficult to make look graceful! Quick note: The big radius rod bolts on the rear suspension go through the running board brackets. This means you can use that to bolt the bracket to the frame before drilling any holes. Then with it bolted in place you can use the bracket as a drilling template and that will ensure that the bracket is in the correct location.
- Before you get too excited about using the power drill, you’ll start by clamping EVERYTHING.
- Trim all the lips to clear the brackets and anything else you’ve mounted to the frame (we had some wire we’d put in a tube and run along the frame that we needed to work around).
- After everything is clamped and trimmed – break out that power drill – it’s time to party drill.
- Start with the cab (body) to the skirt. Those suckers are the pivotal point of the whole thing working. Drill a hole, throw a bolt in, repeat x 100 (okay – technically no more than 64 times – that’s as many generic bolts as you get). You’ll move onto the front/rear next (either) then finish with the running board. While this part may feel labor intensive and achy armed, may I warn you that it’s just your warm up?
- Once all the fiberglass is bolted together – you’ll want to drill your holes on the front and rear fenders and running boards into the brackets. We ::may:: have forgotten to do this pre paint and it was a bit nerve wrecking watching it happen post paint work.
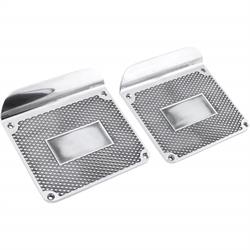
- This will also be when you want to get the mock up together for your step plates. Trust me, with as adorable as this car is, and how many people are going to want to climb in and out – you’ll want some step plates. Especially considering how important it is to step in exactly the right spot! You may even want to make a fancy little “step here” sign. Or etch it in.
- Now that you’ve done all that work – tear it all apart. We understand the sadness here.
- You’ll send your brackets out for powder coating, send the fenders off to paint. Making sure you add POR-15 (or another protectant) to the underside to make sure no rocks hit the bottom and star your paint!
- When they come back from paint – you may need to re-open the holes. Not terrifying at all to take a drill near a freshly painted fender.
- This is when the charming work begins. You’ll have the brackets on (beautiful and powdercoated!) and you’ll start – again with the front and rear. Easy as pie right? Nut, washers and bolts through each.
- Next are the aprons. What we learned is that fiberglass (even freshly painted beautiful fiberglass) – is pretty sturdy and you shouldn’t be afraid to give it a shove in the right direction. Nut by nut, bolt by bolt, you’ll work your way to getting the fender secured. Same with the running board.
- Step plate on!
- Done! The car is beautiful. Your arms are now sore. And your buddy is insanely jealous of your t bucket face lift!
Huge shout out to our very smart, wicked product designer Jeff and our handy engineering buddy Adam for making all of this possible by actually CREATING the parts, talking us through the process, and for getting them stocked on the shelf, you guys rock. I promise you – all of these crazy steps are worth it for the reaction you’ll get… Check out our post later this week when we do the big FINAL REVEAL! Until then, I’ll be resting my arms, #BucketBetty