Sheet Metal Dimple Die Set
It's all in the details
You can have a lot of fun adding a custom look to your sheet metal. There are many ways to add subtle or not so subtle accents to metal. One way is using a set of Dimple Dies. Now, there are many types of Dimple Dies on the market, but Speedway Motors has you covered at a price that is hard to beat. You can pick up a set of Dimple Dies that will allow you to put dimpled holes in sheet metal at a fraction of the cost of some of the other options.
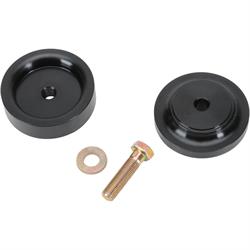
The Dimple Die set from Speedway Motors is under Part# 91084100-set and that gets you is a set of 7 different dimple dies in the following sizes, 1/2”, 3/4”, 1”, 1-1/4”, 1-1/2”, 1-3/4”, 2”. The dies are made out of 4130 Chromoly steel and has a durable black oxide coating for years of lasting service.
These dies will create high-quality dimples in material with a maximum thickness of 16-gauge.
NOTE: the dimple dies WILL NOT punch a hole in the material, it only dimples the edge of an existing hole, that has been drilled either with a drill bit or bi-metal hole saw.
The first step is to layout how far apart that you want the dimples to be, this step is very important and it's imperative that you double and maybe even triple check your measurements so the dimples will be perfectly symmetrical. There's a couple of ways to do this, you could use machinist's dye and a scribe, or something as simple as a marker to layout your lines.
After you have all your lines laid out it's time to drill the hole for the dimple die. Be sure to center punch where you want the center of the hole to be. Then either using a drill bit or bi-metal hole saw, drill the appropriate size hole for the die. For demonstration purposes, I used a 1/2” hole saw in a cordless drill to drill the hole. One thing that will need to be done is to make sure your dimpled hole is round with no burrs. This can be done with a deburring tool, file, or a sanding roll, just make sure that you don't take off too much material otherwise the dimple could be distorted.
This is where the instant gratification happens, take the half of the die with the male mandrel and place it in the hole, making sure it's facing the correct way that you want the dimple to be. The half of the die with the male mandrel will create the rounded edge.
Next place the material in a vise with the die close to the vise jaws, then insert the bolt and washer through the die, and then place the other half on the other side and snug the bolt down. Be sure to check to make sure the die is fully inserted in the hole, then if everything looks good you can tighten the bolt down. You can use a wrench, socket/ratchet, or like I did using a cordless impact.
After you've tightened the bolt down all the way, you can unbolt the die, and you'll have a nice dimpled hole in the material, and then off to the next one.
Using the dimple dies can be very addictive, once you start you won't want to stop.