Hooker Header Installation Guide
Headers. They are fun to talk about and build good power. If you’re like me, you've priced headers for every vehicle you own and considered if it was worth your time to install them. So what's not to love? The install and leaks. Most headers, being larger diameter for increased flow and more gradual bends than your restrictive factory exhaust manifolds, often take up more real estate. This can lead to a lot of headaches when bolting them up.
I'm in the middle of reviving a basket case 1967 Pontiac Firebird convertible. The car has been the subject of all my attention and money in the last few months. The paint and body work are great, but the whole engine bay and sub-frame have been neglected throughout the years. The headers that were on the car were obviously leaking pretty bad. They had some multi-layer gaskets (good sign) with black exhaust carbon stains through the gaskets to the outside (bad sign). There was some evidence of some high temp RTV (proud of this attempt, knowing the former owner) and some header bolts that were at about 600 ft/lbs. So, despite the headers being rusty, the writing was on the wall that I needed to put some new headers on my freshly re-sealed and painted engine.
The headers on the car were a 3-tube design, which combines the two center exhaust ports into one ovalled center tube. I think this causes a sealing issue, as well as feeding two cylinders into one primary tube, which seems counter to our increased exhaust flow idea of adding headers. I asked a Facebook group of Pontiac enthusiasts what were the best fitting headers for 1st gen Firebirds. I had a few responses and even some pictures of fitment. The far and away winners were Doug’s Headers and Headman. I checked the price on the Doug's Headers and considered them, but for my budget and this car I wasn't willing to spend $700+.
So, Hooker headers got the nod, mostly due to nostalgia. I also did some research to confirm that the flanges were thicker than standard and that the collectors were 3" like the headers and exhaust that were on the car already.
Unboxing and Product Details
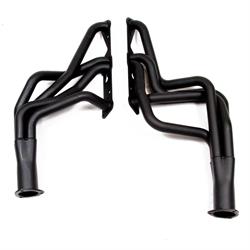
The headers came in a great logo's Hooker headers box and the headers were bagged in bubble wrapped bags.
It included:
- A thicker set of soft metal gaskets
- Collector gaskets
- Header bolts with smaller diameter bolt heads (not small enough we will discover)
- Collector bolts
These flanges are very thick, over 3/8", they shouldn't warp or flex to leak. Something I couldn't tell from the online listings, but suspected is that the flanges are completely machined surface flat where they meet the head. Many older designs of headers stuck the tube through the flange and welded them in relying on the sharp tube edge to push into gaskets to seal with a lot of pressure on a small amount of real estate. This style of headers seem to always leak for me and I was glad to see the Hooker headers were welded and then machined to give a much broader sealing surface.
The flanges have a keyhole looking cutout, as well as the gaskets. A larger diameter hole than the head of the bolt and a slot back to the factory location, next to the tubes for cylinder 5 and 6. These tubes fold back over the top of the head of this bolt, and are always the hardest ones to install. They are painted a flat black to keep them from rusting. This paint won't be functional over time, but as they were unboxed they still looked great.
Install and the Beginning of Some Struggles
I started with the driver’s side as I had the most concerns with fitment of the steering box, clutch Z bar and starter. Us Pontiac guys are a glutton for punishment. The fuel pump and starter are on the driver’s side with the steering and starter, which is what makes header fitment so fickle. I removed the power steering box and Z bar and dropped the header in from the top, leaving the bubble wrapped bag on the header to keep from scratching up the paint. It seemed to fit up pretty well. The bolt behind cylinder 5 was installed 1/2 way in and I was able to put the header and gasket over the bolt head through the larger portion of the slot and slide it back toward the firewall to secure it. I played around with this method a few times getting the bolt screwed in as far as possible while still letting me get the header on and slid back into position. This saves me from making more turns with a wrench in the end on this difficult to access bolt.
The other bolts went in easily and I had pretty decent access to them for tightening down. I checked the clearance with my battery cable and starter wiring, and installed the Z bar for a quick mock up. Everything was working pretty well and the first wave of false confidence began to seep into my greasy brain. "Time for that steering box to fall on and then we're already over to the passenger side header where nothing is in the way", he ignorantly gloated to himself. I slid the box down the inside of the frame rail from the top and right as the bolt holes began to line up. I could hear the dull think of the hollow tubes scraping against the steering box.
Upon some inspection it looks like the down tubes of the #3 cylinder, which has to go to the outside of #1 to get into the collector. It was too far out from the center-line of the engine and ran into the bottom of the steering box. The interference was pretty slight and I could basically shove the box into position and start the bolts by deflecting the header away slightly. The choice was there. Box them back up and send them back for being 1/4" wrong or make them work? I forged ahead with a torch and hammer set beside the car and the steering box completely removed. I marked the spot of interference and fired up the torch. I heated an egg sized spot up on the #3 tube.
I got this entire spot evenly heated and glowing a dull orange, very far away from a cutting torch temp. I kept in mind how thin the tubing was with some extra panic in my head thinking about how easy it would be to have the thin gauge of tubing melt through and ruin a brand new set of headers. Less heat would be safer, I suppose, especially if you have the room or a big enough hammer to finesse the tube without as much heat.
I used a small body hammer in between the frame rail and header tube and began flattening the tube from the center of the spot working outward. After letting it sit and cool a few minutes I installed the steering box for trial run #2. Luckily, it seemed that the tube had moved just enough and gave me 3/16" or so of clearance to the box. The outer tube had been flattened about 3/16-1/4" by about a 1" tall by 1/2" wide ellipse. I was pleased with the result from a fabrication standpoint, but ultimately would have rather had them clear them without altercation. I suppose my hammer and torch saved me $500 compared to the Doug’s headers, and that sat well with my frugal sensibilities.
The passenger side headers installed rather uneventfully. The one issue I had was that the pesky middle bolt where the tube quickly folds back over the head of the bolt. I put this bolt on first as with the driver’s side and slid it though the quick install header flange. With the header pushed all the way back, the rest of the holes in the flange were still not lining up with threaded holes in the head. The tube, #6, was folded back so tightly that it hit the hex head of the bolt and prevented the header from sliding back far enough. I ended up removing this bolt and taking it to the shop bench. I put two nuts on to the bolt and locked them together with 1/2" wrenches.
Then clamping those nuts in the vice, I used a cut off wheel in my DeWalt grinder and removed the top half of the hex head. I knew this was a risky move and would surely result in a future wrench slip and blood on my freshly painted engine and sub-frame. It was a calculated risk and I forged ahead. This seemed to be the last of the Murphy's law of headers that I had to overcome and with the shortened head of the bolt I was able to start the rest of the bolts through the header flange without issue.
A Final Pontiac-Specific Conundrum
There are two bolts on each head that are quite odd compared to the standard header install. Factory manifolds typically didn't have a bolt at either of the very ends of the head. The issue is that the blind holes line up directly with head bolts, not header bolts, head bolt that hold the head to the block. They are sometimes not tapped in this spot, and with the rigidity of factory manifold there are no leaks when only using four bolts total.
When they are threaded by a machine shop or some factory heads are threaded, they are a larger diameter bolt and will take a shorter bolt than the rest of the header bolts. I made custom bolts for these 3/8" x 1" or so bolts. I also used my micrometer through the header flange sliding the tail of it through until I hit the head bolt hiding vertically in the back of the boss. I used this measurement to be a no-go gauge on bolts. I picked out some that were a bit too long and cut them down to be 1/8" shorter than my micrometer length. This ensured the greatest thread engagement, while preventing the bolt from bottoming out and losing clamping force. I checked each of these bolt lengths individually and made custom bolts for each (they seemed to all be roughly the same length.)
So, there it was, headers on a Firebird. It took me about three hours, but it was a fun install and I was excited to have them on the car. Overall, I was impressed with the quality and packaging of the headers from Hooker. Although there were a few bumps in the road and fitment issues that I encountered, I think it's a good product for the money. Speedway offers a wide variety of Hooker headers and components to complete your header project.
I started out in the project thinking that there would be some fitment issues because it was a header install, so there would be some work to get them on correctly. It took a little patience and thinking, but the extra hour saved me $400-500 in the price of the product. Four hundred dollars an hour..a shop labor rate I could get used to. Also, they looked a lot better than the pile of rusty, leaking tubes laying outside the garage. So, in the long run I'm one step closer to getting this old bird back on the road.
Next up is getting the freshly painted steering components all back on the car and the 100 other things on the checklist before spring!