Custom Battery Box and Cables
During a car build, plans don’t always work out. These types of situations require adaptation… and access to a well-stocked machine shop is helpful too. We had purchased a battery box for the coupe but it ended up being too bulky for the floor space allotted. We needed to figure out a different solution for a battery box, so a custom box was in order.
We started with a steel sheet, cut notches into the corners and marked the intended bends. Then we used a brake to bend the metal sheet on the marks.
It got a little tricky toward the end, but if you slow down and think about the end product, it'll come out alright... the second or third time.
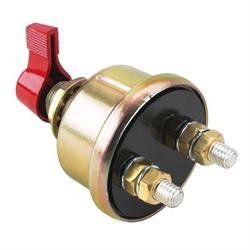
Then we welded little threaded tabs onto each end of the box. Two lengths of all-thread twisted into the little tabs and up into a hold down bar which runs across the top of the battery. The hold down bar was extra-long on one end so it could be used to attach a battery disconnect switch.
The battery cables are heavy duty. We stripped the end of the cable to expose the copper wire, looped the shrink tube onto the cable, and put the ring terminal in place.
Ring terminals are designed to connect or terminate a single wire to a screw or stud type electrical connection. We used a hydraulic press to cinch the ring terminal around the copper wire permanently.
No wimpy soldering iron here... we got out the torch and soldered the ring terminal to the copper wire.
Then pushed the shrink tube up into place and used a heat gun to shrink the tubing into a nice and tidy little battery cable.
We drilled holes in the body and inserted a gasket type plug and bolt in each hole. The battery hooked up to these bolts so the battery wire for the starter could run under the car.
It turned out very clean after we powder coated the battery box tray. When I maintain the battery every winter, I check out the connections between the battery and the coupe floor. The rough roads of Lincoln will rattle my connections loose if I don’t keep an eye on them.