50 Chevy Patch
For years I have flipped through car magazines and attended car shows always in awe of the perfectly straight smooth body lines of finished cars and bare metal restorations on early custom cars. I feel that I have a very good and particular eye for these details, which in turn has given me a huge amount of hesitation to tackle body work and sheet metal replacement on my old projects, a 50 chevy pickup and a 66 GTO plagued with typical Nebraska rust.
I have always wanted to be a great craftsman with sheet metal, but have never found the time or people to learn from. As my truck's air ride chassis was coming together quickly it was time to stop avoiding the inevitable and take the plunge into making some patch panels. I began installing new replacements from Speedway to get my truck on the road.
I can say that after a few months of working on it, it's been one of the most rewarding projects I have done on a car. I have more to learn, but am excited with how much I've picked up. I aim to take some of the apprehension that can come with cutting a whole panel out of your cherished project and encourage amateur restorers like myself to kick start their sheet metal work list.
Fortunately, there have been many opportunities to learn how to replace sheet metal on my 50 Chevy truck. I've replaced the cab corners, bottoms of the doors, drivers side floor, kick panel, outer cowl and patched a few other spots as well. I'll outline the inner cowl, outer cowl and connecting cowl piece in this recap. Often times on these trucks this is a big source of rust as it's easy for water and salt to get trapped inside the lower cowl, there is a drain but it easily plugs with debris. The tires line up with it and sling into this cavity.
I began by taking a flapper wheel on my grinder and running quickly up and down the flanges where the outer cowl panel met the door jam and the intermediate cowl panel. The sheet metal was stepped back from the body surface and this was the mating flange where the factory spot welds were attached. The flapper wheel quickly removed the paint from the flush panels, and left paint in the divots from the factory spot welds.
Next, I used a spring loaded punch tool to mark the center of the welds. A 3/16" drill bit was used to drill into these spot welds and release them from the structure of the door jam and intermediate cowl piece. I also used a specialized spot weld drill bit, which is a small holesaw bit, with a spring loaded pick in the center to center the holesaw over the spot weld. This tool can be a bit more finicky to use, but does a great job of not disturbing the structural backing panel and only removing the material from the surface panel.
I got the outer cowl panel loose on the front and back of the cab, but there was an overlapping seam at the top near the rear view mirror mount point. The seam was buried by factory original lead and it was done so well that if I didn’t already have the replacement panel, I would have not realized that the seam lay buried in this spot.
To remove the factory lead, there are a few options. It's important to remember that lead can be dangerous to work with if it is disturbed and turning into a fine dust like caused by a DA sander or a grinder with a flapper wheel. It can be removed in this fashion, but only in an area with ventilation and with the use of a respirator and mask.
I chose to slowly heat the panel with a torch in broad strokes, heating a large 12x12" area until the lead began to fall off of the panel. I was wearing a respirator and had a fan pushing any fumes away from the truck and out of my shop. The lead was now gone, leaving the exposed welded seam. I drilled out the spot welds and after some negotiating and the proper application of vocabulary, the original rusted panel was free and in the bin.
Now with access to the panels behind the outer cowl it was easy to see that the problems ran much deeper than the surface. In the end, I also replaced the inner cowl panel, Inner to Outer Cowl Piece part number 92633458, and made a patch for the lower rocker rail that ties these panels together.
While I had access from all sides for welding, I also replaced the driver’s side Inner Cab Floor Pan, part number 92633884. This all had to be done prior to putting the final outer cowl panel on as icing on the cake. I'll avoid all of those steps for the sake of brevity. One key point to mention is that prior to welding the intermediate panel to the inner panel, I painted the entire inner panels and door pillar with Por 15 rust preventative to keep any future rust issues at bay. I also covered each seam of the intermediate cowl panel with seam sealer to completely close off any access to this area from the inner fender and tire.
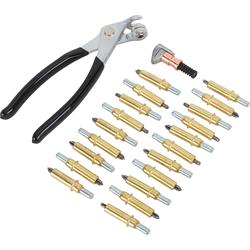
There was some time spend making all of these aftermarket panels fit to my liking, however the time spent was minuscule as compared to making panels from scratch. The entire task was made simple by my new favorite sheet metal cheat, Cleco Clamps, part number 91004001. These clamps are a great way to hang the sheet metal to the body in a consistent repeatable fashion. I simply clamped the panel in alignment with a vice grip, checked all the edges and adjoining panels for proper alignment then drilled 3/16" holes in several location on the spot weld flange.
The Clecos are spring loaded clamps that fit through the 3/16" holes and hold the two mating panels together firmly, but temporarily. I was now able to mark on the panels areas where they were not aligning properly, remove the outer skin and grind or hammer and dolly the offending area to create a perfect fit.
One spot that really gave me some strife was the upper cowl panel curvature behind the back corner of the hood. No matter how much i pried on the panels I consistently had a 1/4" gap when the rest of the cowl panel was in perfect alignment. I was able to mark the panel in the spots with the largest gap, remove and take to the work bench to tweak it in to place. Each time returning and installing with the Cleco clamps left me in a consistent position to see where I was gaining.
Once I was happy with the fitment of the panel, and before installing it with the Clecos for the final time, I used a sheet metal punch/flanger tool to put several evenly spaced 3/16" holes in the outer flange of the panels. This is where it would attach to the door jamb and the intermediate cowl panel.
Reinstalling with the Cleco clamps I now had holes for my spot welds to secure the panels. When welding sheet metal, heat can be a serious issue and cause all of your patience and hard work to become a warped mess. I run my Miller welder in a very low setting, and when you have such a low voltage it can be hard to get a good arc and clean weld for such a short duration of welding. Due to this problem, it is crucial that both panels be properly prepped with a grinding flapper wheel to have fresh bare metal to weld to. It is just as important that the ground is attached to clean bare metal on the two panels you are joining, not just anywhere on the body.
With the proper steps taken up front, it's easy to achieve a perfect spot weld on your 2nd or 3rd try. Be certain that if you decide to weld any of the panel seams together, weld in short increments keeping an eye on the heat. Don't hesitate to walk away and clean your workbench to let the panels cool before continuing. Once the panel was attached I dressed a few of my taller spot welds with the flapper wheel and wiped it down with paint thinner. A few quick coats of self-etching primer to keep it from flash rusting and I was on to the next area of the truck to replace more sheet metal.
Check out my next article where I complete the install of this panel by learning how to apply lead filler back into the upper seam of the panel. I figured it stay perfectly for 60 years, why fill it back up with anything else!