How to Wire a Race Car I DIY Wiring Harness 101
You built the engine and got it installed, perfected the body work, perhaps you even got some impressive suspension installed under your Camaro that you can’t wait to try out. But after pouring countless hours into your race car or hot rod there’s usually one final, sometimes daunting task to complete—wiring. For some people this is where they start thinking about farming out the job to a local hot rod shop to complete. We promise you though, it’s not any more complicated than anything else you have done up to this point. Once you have the basic understanding of 12-volt wiring theory and the general guidelines, you can certainly learn how to wire a race car yourself. If you take your time and have the mindset of doing the same level of work as a professional shop, you will enjoy many years of trouble-free service because the job was done correctly.
How to Make a Wiring Harness at Home
If you have the knowledge on how to wire a race car and a bit of extra time, you can certainly build your own wiring harness at home. Maybe your dune buggy wiring needs to be completed and it is an extremely basic system, just enough wiring for lighting, gauges, and ignition to get the engine to fire up. You really don't need a bunch of extra wiring for air conditioning and radio and other accessories such a spartan ride doesn’t even have. Your drag car wiring may be slightly more complex, adding a few more circuits for cooling fans, electric fuel pump, or a trans brake, while a street car will typically have the largest need for more circuits to cover items such as power windows, large audio systems, air conditioning, and other features found on a typical street car. So, if the project warrants the most basic of wiring needs, yes, you can certainly make your own wiring harness at home using bulk wire, terminals, and a fuse block.
How Long Does It Take to Replace a Wiring Harness
Replacing a wiring harness isn’t the most difficult task, but it isn’t something that you want to rush through. We would suggest taking some extra time when completing a project like this. Making sure that your connections are crimped correctly, the wire gauge has been sized correctly, and completing the final additions like wrapping the wiring harness takes some dedication to pay attention to the details and finish the job successfully. Depending on the number of circuits, the level of vehicle assembly (or disassembly) and whether you are building a harness from scratch or starting with a pre-made universal wire harness kit will all weigh on the actual time it will take to wire your race car or hot rod project. You may be able to wire a basic race car system or even a classic muscle car with a basic universal harness in a weekend, whereas a more sophisticated project with a high number of circuits (along with interior trim removal, wrapping the harness, and making it all “show worthy”) can take upwards of 40 or more hours.
Basic Race Car Wiring I How to Wire an Ignition System
One of the first things you should do when starting your wiring harness is to figure out how many circuits you will need. Is this a bare bone drag car wiring harness, or something where you will need more circuits, such as a street car with heat, air conditioning, and a radio? Create a list of items such as headlights, starter, cooling fans, etc., then make a quick sketch of your basic wiring diagram to give yourself a good path planning for wiring harness installations of how you will put this together. This will be a great place to start thinking if you are going to build your own DIY wiring harness or use a prebuilt harness such as our 12 Circuit Universal Wiring Harness.
A basic race car wiring diagram will show you the fundamentals of the electrical system to get any car running. For a typical race car, you’ll need to provide starting, charging, and ignition circuits for the vehicle to be able to crank the engine, provide spark to the spark plugs, and maintain the vehicle’s charging system once running. Obviously, this is the most spartan of wiring and does not include wiring for electric fuel pump or electric cooling fan. The diagram below assumes you are using a mechanical fuel pump and an engine driven cooling fan along with mechanical gauges. Any additional circuits, such as an electric water pump, will need to be added using the product’s recommended wire gauge size and circuit protection.
Basic Race Car Wiring Diagram
What Gauge is Automotive Wire?
Although determining wire size isn’t too difficult, it is an especially important step when building your own DIY wiring harness. You can figure out which gauge of wire to use by knowing how many amps your circuit will draw and how long of a run the wire will be. Utilizing a 12v wiring gauge chart, such as the one we’ve provided below, when determining what gauge is automotive wire makes it a bit easier. You want to make sure not to undersize the wire here, as in extreme cases a load that is too high on a wire that is too small of a gauge can cause a fire (a good reason all circuits must be protected with fuses or circuit breakers). Of course, you don’t want to just get the thickest gauge of wiring you can find and use that for everything, as you will end up with a wiring harness that is far too bulky to route and will add unnecessary weight to your race car.
We highly recommend using different colored wire such as this 14-gauge wire, for example, which will handle most circuits up to 15 amps versus running a single color of wire for your whole harness when making a custom harness of your own. Looking at a sea of all red or all green wires can make it far more difficult when tracing wires for installation or diagnosis. Keep your main power wiring consistent as well with red for positive and black negative. Your primary power wiring, ignition wiring, and so forth may use the same size wiring, or it may be sized up or down according to the product’s instructions/needs. Generally, most circuits will use between 10 and 14 gauge wiring (remember, the larger the number the smaller the wire). Power hungry circuits, such as ignition boxes, electric fans, electric fuel pumps, and so on will most likely need an 8 gauge wire, again depending on the product’s electrical demand and the length of the wire run from the power source to the load. A cooling fan three feet from the battery can most likely use a smaller gauge wire, such as 10 gauge, versus a big power hungry electric fuel pump mounted 12 feet away at the back of a race car, which should be wired with 8 gauge.
12v Wiring Gauge Chart
DIY Wiring Harness for Accessories
Determining the DIY route or if perhaps it is better to purchase a ready to use harness will depend on the project at hand. Are you completely wiring a bare race car chassis or simply wiring a few mechanical gauges in a panel that requires power for lighting? The decision is ultimately yours, and while a pre-made gauge harness will save you time and headaches, if you know how to wire a race car and you’re willing to build a custom harness with bulk wiring and terminals you can save quite a bit of budget for other items your race car may need. Helping to make that decision may be by having the typical universal wiring harness explained and how they can solve a problem with an easy to understand installation. This is a huge plus and worth the added expense for those that just know the basics of 12 V wiring.
Build Your Own Wiring Harness Kit
Perhaps you like to build everything yourself and want to put together your own homemade wiring harness. It’s not terribly difficult to learn how to make a wiring harness. Start by finding the proper fuse blocks that will fit your application, gather the correct relays, determine the correct gauge primary wire for the different circuits, and get enough for the entire harness. Don’t forget about the electrical connectors as well. With careful planning, choosing the correct components, and dedicating the time to build it yourself, you can end up with a solution that fits your application exactly the way you want it to.
Universal Wiring Harness Kit
With a universal wiring harness kit, the fuse block is included, the wiring has already been gauged correctly for the predetermined circuits, and they often come with much needed items such as connectors and relays. Vehicles that need the basics, like a race car or a T-bucket can get by with a 10 circuit universal wiring harness or a 12 circuit universal wiring harness, whereas a vehicle with a lot of options and creature comforts will most likely use a harness with 18 or more circuits. Most of the time the wiring is labeled for easy identification and installation. How long does it take to replace a wiring harness? Well, if you start with a universal wiring harness kit, you’ll already have a good head start over a DIY wiring harness. This is still a project that you will want to focus some time on and double check your work as you go, as mistake proofing your work will save tons of time tracking down issues that were caused by rushing the job. These kits will include a universal wiring harness diagram that makes it easy to get all the wires going to their intended circuits. This may be a better option if you have no clue how to wire a race car and feel intimidated about starting from nothing with a spool of wire and a handful of terminals.
What Wiring Harness Do I Need?
If you’ve decided that the best way to go for your project is a prebuilt wiring harness, now you’re asking yourself, well, what wiring harness do I need? With so many different options out there, it’s important to get the wire harness that is best for your project. Taking those steps earlier to determine how many circuits you need and sketching out a basic diagram makes this a bit easier. As we just noted above, for a race car or a hot rod or kit car with limited electrical needs, something with 10 to 12 circuits will be more than enough to get the vehicle powered up and running, including lighting, ignition system, gauges, charging and starting circuits, and possibly one or two extras that can be used for anything from in-car communication systems to USB charging ports.
10 Circuit Wiring Harness
This 10 circuit universal wiring harness from Painless Performance is an excellent choice if you are looking to go the prebuilt harness route. Painless has been around for over 30 years and has built a wide selection of different wiring products. With only 10 circuits on this 10 circuit wiring harness, Painless has given it a “race only” designation. It has 15 feet of wire length to the accessories, and 10 feet to the switch panel. The wires are oversized and custom printed for easy circuit identification. Eight of the 10 circuits are powered through 40 amp relays for race car components like electric water pumps and fuel pumps, electric cooling fan, and more. This 10 circuit wiring harness is also designed to integrate into your race car with the Painless 8-switch panel to control your electrical components.
12 Circuit Wiring Harness
The Speedway Motors 12 circuit universal wiring harness has a few extra features over the Painless harness, including wiring for your instruments and dash, plug-and-play connections for 1968-96 GM tilt steering columns, as well as 12 individually fused circuits. Maybe you don’t have the time to learn how to build your own homemade ignition system. This prebuilt 12 circuit wiring harness makes it easy to figure out how to wire an ignition, with each circuit being color coded and labeled every 6” for easy identification. The fuse block uses modern blade-style APM/ATM “mini” fuses and has a compact size to make it easy to mount out of view. Each 12 circuit wiring harness features premium quality GXL copper automotive wiring with the correct wire diameter for each circuit, ranging from 8 to 16 gauge. You could build your own wiring harness kit but starting with a harness such as this 12 circuit wiring harness will make the job go much faster.
12 Circuit Universal Wiring Harness Diagram
Helpful Automotive Wiring Tools & Tips
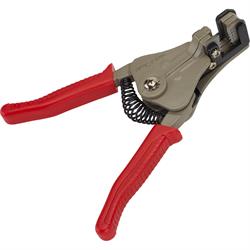
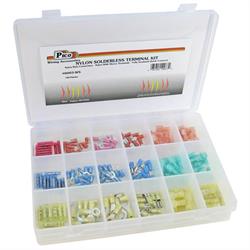
Using the correct wiring harness tools not only makes the job easier, but it also provides a way of ensuring that the wiring will be free of issues. Those dollar bin crimpers and a lighter for your shrink wrap sleeves shouldn’t be used if you want reliability. Save those for temporary emergency repairs if needed (on your friend’s car, because you did yours right!). Grab a pair of good automotive wire strippers, some model of multimeters and wiring testers, and a good terminal assortment to get you started building your own harness, doing 12-volt electrical add-on projects or repairs.
Like crunchy versus creamy peanut butter, everyone will have an opinion on whether you should crimp or solder your wiring connections. For some it is a matter of preference, while others it may depend on access or the type of circuit. The same can be said about using shrink wrap, wire sleeving/split loom, and electrical tape or harness tape. There is no wrong answer here. It simply comes down to preference, accessibility, comfort level/familiarity with the product, and of course the time and expense of using each product. We’ll go over some wiring harness tools options below, but ultimately your harness build may end up being a mix of these build ideas. For example, hidden wiring may only use a few tie wraps and loops of harness tape to secure, while a visible engine bay harness may receive split loom and a complete harness wrap for an OE appearance.
Crimping vs Soldering
Look at a modern OEM wire harness, you’ll see that almost all the connections are crimped, not soldered. Why is this? Isn’t a soldered connection stronger? Well, that depends. When you use high quality wiring crimpers, like the PerTronix ratchet crimper, you end up with an exceptionally reliable crimp that is superior in most cases to a soldered connection. A solder connection chemically bonds the wires, but it also hardens the wiring. If too much heat is applied, such as from an inexperienced user, the solder can wick far past just the joint where it was applied. This hardened joint is now a possible failure point, and in the future it could crack. Sometimes these solder joint failures can become one of those infamous intermittent issues, failing during a bump, but working again after. Of course, that doesn’t mean that a good, soldered connection is just going to fail. A soldered connection that has been made correctly, with the solder not wicking too far into the wire will provide trouble-free service for most applications. A good soldering iron can help you keep the heat where it’s supposed to be and reduce the amount of wicking that happens. When deciding crimping vs soldering, if the joint is going to be prone to vibration, soldering isn’t recommended. Also, you shouldn’t add solder to a crimped connection as the solder wicks up the wire and can weaken the wire and make it vulnerable to cracking.
How to Heat Shrink Wire Connectors
With any connection, soldered or crimped, you will need to cover the wires. The most reliable and professional way is to use heat shrink tubing. Avoid using black electrical tape on exposed wires and connectors. If you haven’t done it before, it is quite easy to figure out how to heat shrink wire connectors. The hardest part is making sure to remember to put the heat shrink over the wiring before you connect the wires! Just slide the heat shrink over the wiring, then simply use a heat gun to safely apply heat and shrink it without the damage an open flame may cause to the shrink sleeve. One thing to look out for when picking out your heat shrink tubing is the shrink ratio, some will shrink 2:1, some 3:1, and there are other types that are higher ratios such as 6:1. This means if you use a 2:1 heat shrink tube, it will go from 1-inch diameter to 1/2-inch after applying heat. If you need complete insulation of the connection look for dual wall shrink wrap that uses an inner lining of adhesive to seal the connection from the elements. You also will find solder heat shrink wire connectors that can save you time by incorporating the heat shrink right into the wiring connector.
How to Wrap a Wiring Harness
Walking around a car show, or in the pits at a race, you can always spot the shade-tree mechanic that is “electrically challenged” with the rats nest of a wiring mess under the hood. They will be chasing electrical issues at the worst possible time, like when they’re gridding for the race, or 100 miles from home on a cruise. When you route your wiring harness neatly and professionally, it doesn’t just look nice, it adds a huge layer of reliability to the system. Making sure that your wiring isn’t going to be rubbing or vibrating on sharp edges and adding a high quality wire loom gives your system that added level of protection, while looking great. On this C5 Corvette engine bay pictured here all the aging, brittle factory plastic split loom tubing was replaced with nylon braided loom. Then the ends were finished off with heat shrink tubing for a clean and simple look that keeps the engine’s wiring harness securely in place. It is super easy to learn how to wrap a wiring harness. You can use an OE-style split loom. You just open the loom at the seam and put the wires in. Or try overlapping braided nylon or cloth-style loom. Wrapping your wiring harness with harness tape is the perfect way to put that finishing touch to your build.