U-Joint Identification | Types of U-Joints Explained
Speedway Motors employee Pat Orth takes a few minutes to share a quick Tech Tip on how to properly measure your yoke for a universal joint.
The humble universal joint (usually referred to by the simpler term of “u-joint”) has an important job delivering your engine and transmission’s power output to your rear axle. A lot is said about having a strong driveshaft to handle your horsepower level, but little is often mentioned of the proper u-joint size needed. You can have a performance driveshaft, but if you’re using the wrong types of u-joints you can end up with noise or even broken driveline parts.
How Do U-Joints Work?
The u-joint itself is made up of a steel body, cast or forged, into a cross shape with bearing caps at each end of the cross’s “legs” that are supported by fine needle bearings. You’ll find these types of u-joints at each end of a typical rear wheel drive vehicle’s driveshaft. U-joints are designed to accommodate minor driveline angle and suspension ride height changes as the vehicle rolls down the road. This allows the driveshaft connection between the transmission and rear axle to transfer the transmission’s rotary output to the rear axle’s input (the pinion gear flange/yoke) no matter the road conditions.
Different Types of U-Joints
You can find u-joints in solid body or hollow body designs (the hollow body allows greasing of the needle bearings via a grease fitting) and in various bearing cap dimensions. These are sized via “series,” and you’ll often hear people say that they need a ”1310 series” u-joint. These four-digit series codes are how cap diameter and overall joint width are categorized. However, where things get sticky for enthusiasts is when driveline swaps or aftermarket performance driveline components are used. Your stock 1310 series u-joints may no longer be the correct size to connect your driveshaft to that killer 9-inch rear axle you just installed.
1310 vs 1330 vs 1350 U-Joint
While there are other series of u-joints within the driveline components industry, the three most common u-joint by size for passenger cars and light trucks are the 1310, 1330, and 1350 series types of universal joint. These types of u-joints are comprised of a specific body dimension and cap diameter and must be used with the matching driveline flanges/yokes for proper and safe operation. Just remember that as the series numbers increase, so does the overall strength of the u-joint.
Most factory u-joints up until the mid-1970s were of the 1310 series, so with performance upgrades that provide more power, and more importantly more torque, to the driveline an upgrade to 1330 or 1350 series u-joints should really be considered. However, this often requires modification of your existing driveshaft, or a new driveshaft built, but it is worth the effort to be able to use the stronger series u-joints.
As the u-joint series moves up in size you’ll see that only certain aspects of the dimensions change. However, these changes net a significant increase in torque capabilities. When it comes to 1310 vs 1330 u-joint, the 1310 and 1330 joints share the same cap diameter, but the 1330 has a larger body. Meanwhile, the 1330 and 1350 u-joint have the same body dimensions, but the 1350 uses a larger cap diameter. Wider bodies provide more driveline angle ability, while larger caps provide increased strength.
It’s easy to see that the 1350 u-joint hp rating would be the highest, but in the real world you may not need the capabilities of a 1350 series u-joint. Determining the proper u-joint for your needs will include factors such as horsepower, tire diameter, tire compound or “stickiness,” gear ratio, and vehicle weight. See our u-joint dimensions chart below for full size specifications.
Single U-Joint VS Double U-Joint
Your typical muscle car or hot rod (and many two-wheel drive pickups) use a standard single cardan u-joint at each end of the driveshaft to compensate for angular misalignment as the rear axle moves up and down with the rear suspension. This single u-joint is the typical “cross” body u-joint with four bearing caps you’ve no doubt seen on the ends of a driveshaft numerous times over the years. The double cardan u-joint uses a pair of u-joints connected by a coupler that allow a greater working angle. These are usually used in lifted trucks only at the front of the driveshaft where it connects to the transfer case or transmission and are often recognized by the raised pinion angle of the rear axle to remove any angle at the rear single u-joint connection.
Types of U-Joints Diagram
How To Measure U-Joint Size?
Using the correctly sized u-joint in your driveline is critical for proper fitment of your driveshaft to prevent vibration, breakage, and even possible ejection of your driveshaft! This is why, even with the correct types of u-joints used, we recommend a driveshaft safety loop for high powered cars using sticky tires like drag radials or slicks to keep the driveshaft from “pole vaulting” the car if breakage of a u-joint does occur.
There are two measurements you will need to make/confirm to determine the correct u-joint for your application. These measurements are the overall width of the u-joint assembly (from cap to cap) and the cap’s diameter. These two measurements will help confirm what series of u-joints you have using our u-joint chart so you can obtain the proper replacement u-joints. Note that you can have a u-joint with two different bearing cap sizes. These types of u-joints, commonly referred to as conversion or combination u-joints, usually feature a 1310/1330 or 1330/1350 pairing of bearing caps to aid in driveline conversions and are sometimes called a “Chevy to Ford u-joint.”
In some instances, the use of a 1310/1350 joint may be called for. This is important to remember and is why we recommend always measuring a bearing cap off each “cross” of the u-joint for proper u-joint identification, as the difference between a bearing cap for a 1310 u-joint vs 1350 bearing cap is only 1/8-inch (.125”). The use of calipers or a micrometer is highly recommended for accurate measurements. Your basic 6-inch caliper will cover most any u-joint measurement you’ll need to make.
U-Joint Bearing Cap Sizes
When we are discussing the various bearing cap sizes of a u-joint it is important to note that the measurements between the different u-joint cap sizes are minimal and can be tough to confirm with a tape measure or ruler, which is why we recommend a set of calipers for precise measurements that are easy to confirm. But just what is a bearing cap on a u-joint? The bearing cap, sometimes referred to as a bearing case, on the standard single cardan u-joint is found at the end of each leg of the main u-joint body. These bearing caps feature a machined pocket that holds hardened needle roller bearings (and grease) for the bearing cap to rotate around the u-joint body. The bearing cap is a press fit into the driveshaft yoke and is retained by internal or external snap rings. A grease seal is fitted to the bearing cap to keep dirt and other contaminants out of the needle roller bearings and the grease in for a long service life.
- 1310 U-Joint Bearing Cap Diameter: 1-1/16-inch (1.062”)
- 1330 U-Joint Bearing Cap Diameter: 1-1/16-inch (1.062”)
- 1350 U-Joint Bearing Cap Diameter: 1-3/16-inch (1.188”)
Note: Ford used a 1330 “big cap” u-joint that used standard 1330 caps on one pair of caps and a larger 1330F “big cap” size of 1-1/8-inch (1.125”) on the other pair. This thicker set of bearing caps were used in the differential pinion flange location to resist deformation by the bearing cap U-joint straps from being overtightened. Generally, these joints will only be needed if you’re using a 9-inch center section sourced from a late ’70s to early ’80s Ford truck or Bronco. Aftermarket 9-inch center sections will not use these.
But what if you don’t have a u-joint to measure? For example, you’re doing an LS swap in a classic pickup with a new Ford 9-inch axle and need to measure for u-joints to add to your custom driveshaft order. For pinion flanges or transmission slip yokes you will measure the distance between the u-joint bearing cap retaining lugs or from the edge of the snap ring retaining lip to the opposite retaining lip. Speaking of snap rings, you will find u-joints are secured to the driveshaft yokes via inside or outside snap rings. Inside snap rings seat on the inside of the yoke ears, while outside snap rings sit in machined grooves and hold the caps in place much like the lugs on a pinion flange.
How to Remove U-Joints from Drive Shaft
When u-joints go bad you’ll typically have a squeak coming from the driveline at first (indicative of dry needle bearings) which often turns into driveline vibration, and ultimately u-joint failure. The best course of action is to service your u-joints regularly (if greaseable) or replace them at the first sign of noise. When it comes time to replace your driveshaft’s u-joints the job is not difficult, though it does take a couple of extra hands, a press, large C-clamp, or a vice, and suitable work area to support the length of the driveshaft. Using a driveshaft u-joint diagram will help in keeping all the parts going back together correctly.
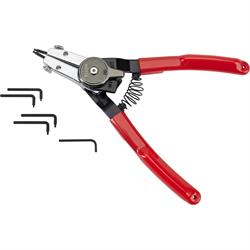
In preparation for u-joint replacement it is best to mark your driveshaft yokes to the trans slip yoke and differential pinion yoke to ensure everything is reassembled in the same manner. To remove your worn u-joints the snap rings must be removed with the appropriate snap ring pliers first. Often, a quick smack with a hammer on the yoke itself or with an old socket or proper diameter steel shaft directly on the snap ring face will help to unstick the snap ring in the groove, allowing it to become free enough to be removed with snap ring pliers. Once the snap rings are removed the u-joint can be pressed through the yoke until the opposite bearing cap is free to be removed by hand. Then, repeat the process back in the opposite direction to remove the other bearing cap, leaving you with just the u-joint body to remove.
To install your new U-joint, carefully remove the bearing caps and place the bare u-joint body into the yoke and all the way to one side. This will allow you to reinstall that side’s bearing cap over the u-joint’s trunnion (the machined surface the bearing cap and needle bearings ride on) and then use a press or vice to apply pressure to the bearing cap until seated below the snap ring groove. You want to do this carefully to not unseat any of the needle bearings. Install the new snap ring supplied. Install the opposite side’s bearing cap in the same manner, finishing with a new snap ring on that side as well.
How to Grease U-Joints
While many OEM types of u-joints are sealed, and often it is preferable to use a non-greaseable, solid body u-joint for its extra strength, for many street going vehicles a u-joint with grease fitting is perfectly acceptable and will last a long time with proper servicing. Access to the u-joint’s grease fitting can be hindered by the driveshaft yoke at certain ride heights. Often simply moving the rear suspension up and down while the vehicle is on jack stands will provide enough clearance to insert a grease gun tip into the location. At worst, you may have to temporarily remove the driveshaft and perform your service on a workbench.
For greaseable types of u-joints it is preferred to flush the old grease and contaminants out by injecting new grease into the u-joint grease fitting until you see the new, clean grease exiting all four bearing caps at the seal area. Pump the grease gun slowly to not damage the seals and do not use a battery or air powered grease gun for this operation. Once all four bearing caps show new grease being pushed past the seals you can wipe away the old/extra grease and clean the u-joint of any exterior dirt and grease. As to what type of grease for u-joints to use, it is best to use a grade 2 high-pressure/anti-wear grease.
Helpful U-Joint Tools
As mentioned above, for greaseable types of u-joints the small bit of maintenance required pays off in longer life of the u-joint. Using a manual u-joint grease gun works best for filling/flushing the u-joint’s grease. We offer several grease gun options to help you keep your greaseable u-joints properly lubed. Don’t forget extra grease fittings (or “zerks” as some people refer to them as). While new joints come with fittings, older joints may have damaged/deformed or plugged grease fittings that will not allow fresh grease to be added. Simply replacing the u-joint grease fitting with one from our grease fitting assortment will have you fixed up and ready for many more miles on the road. We also offer a set of low-profile grease fittings that may just help ease the burden of greasing your u-joints in tight spaces.