Project Chevelle: Rear Axle Upgrade
The Chevelle has gone through quite the transformation in stance, power, and traction to this point and become a real blast to drive. The elephant in the room is the stock 8.5" 10 bolt gm rear axle with an open differential, which surely has an approaching expiration date. The gear ratio, originally intended for much shorter factory tires and a non-overdrive transmission, coupled with our new TKO overdrive and tall tires has the Chevelle prepped for some salt lake driving rather than street cruising. Rather than upgrading the 8.5" we elected to use Speedways 9" conversion axle and brakes to create a bulletproof driveline without breaking the bank, or a helpless 8.5" gm axle shaft. Let's jump into it.
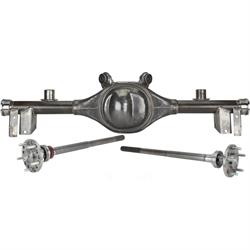
Speedway has recently started offering a full 9" conversion axle housing with 31 spline axle shafts for several popular cars; Nova, Chevelle, Camaro/Firebird, Mustang and more. The axle has all of the rear trailing arm mounts in the stock locations as well as spring pocket and shock mounts. Since we had already installed our Qa1 rear coil over conversion on the stock gm axle, we knew we would not be using the lower spring pockets welded on our axle. Before we sent it out to powdercoat (these axles come in raw finish) we ground the welds off of the spring bucket and removed it for a cleaner look. The axles were engineered to fit with the Qa1 coil over adapter bracket on the shock mount. There are 2 angles on the back of the shock mount as well as an extra hole in the correct position to make the adapter bracket a bolt-on affair. We assembled our third member and brakes to the axle on the shop bench instead of lifting all the heavy components on to the mounted axle. The whole axle assembly was installed onto the car on the hoist as one assembly. The axle lined up perfectly and installed with ease, the only stumble we ran into is my unfamiliarity with Ford axles and putting the shorter axle into the passenger side, rather than the driver's side of the axle. This axle had full engagement, but left me stuck when I tried to put the longer axle in the driver's side. Repeat after me: "long axle passenger side, short axle driver's side!" There you just saved yourself 30 minutes of your life.
Speedway Powertrax Third Member
For many years, Speedway Motors has been selling assembled third members for 9" Ford axles. We carry just about any combination your application may call for from full spool race car to Richmond Powertrax to stock style clutch and spider gear posi units.
For the high horsepower and street use of the Chevelle, we elected to go with the Richmond Powertrax differential. It should hold up well with our radial tires and power level. The 3.89 gear ratio was calculated with our new tire height and highly overdriven TKO 600 transmission to offer us the best window of usable rpm.
An added bonus of the new Speedway third member is that it uses entirely new components, including the differential case. The improved Speedway case has thicker castings and support in crucial areas, such as around the pinion nose to support the abuse of dirt track and drag racing. So not only do we have a heavy duty 9" axle, there are also built in improvements to alleviate any fears of track-side failures.
To marry the axle to the chassis we made use of another new product this year for Speedway, a set of powder coated tubular trailing arms and sway bar. This is a great kit for many reasons, with several added features over the stock components.
Sure we could simply make the same length links out of tubing with the same poured rubber or polyurethane as most aftermarket kits do, and sell them on the benefits of strength and affordability alone, but we engineered additional benefits to create a killer set of trailing arms.
Our kit features adjustable upper links to dial in the pinion angle with any ride height. It also has braces that tie the front chassis mounts of the upper and lower arms together for added rigidity. The GM 4 link in A-body cars was a great suspension to start with and was used for years and years without much alteration. The key to making them work properly is keeping the soft GM rubber bushings from binding through travel.
These bushings made for a great ride and kept the axle square in the body throughout the travel. To a certain power and traction level, they are perfect. When it comes to aggressive launches and larger tires these soft bushings are a weak link. The tubular arms that we supply have giiro bushings that are the best of both worlds. They allow for the articulation of the suspension, as the wheel travels up and down, but when the links are pushed or pulled under a hard launch they are limited in travel and act more like a rod end. This plants the tires and prevents wheel hop. The bushings also have a metal sleeve to contain the through bolt that is free floating inside the bushing. Most poured bushings bind this sleeve to the bushing material, and for proper install you need to tighten the hardware with the car's weight on the axle to pinch the sleeve in the right position. The bushing and sleeve twist as the car travels up and down, which binds the suspension slightly and wears the bushings out prematurely. By keeping this sleeve free to rotate, we eliminate binding the suspension
Best of all, there is no squeaky polyurethane bushing noise. The innovations of these bushings and added strength and adjustment of the arms make the tubular control arm set a home run for our Chevelle and any GM A-body. Once again, these are now on the shopping list for my GTO, rather than trying to refinish the stock stamped arms.
Having installed disc brakes in the front, it only made sense to upgrade to discs in the rear as well. We made use of the 11.25” rotor emergency disc brake kit with 78-88 metric calipers. This was a kit we had used on our Week to Wicked 1952 Chevy pickup build and knew it would be a good match for our Chevelle. With the Chevelle keeping all 3 pedals with our Tremec TKO600 manual, the emergency/parking brake was going to be an integral part of our build.
The Ford 9” had several different brake packages on it throughout the years and if wider brake shoes were used on the drums the axle had to stick further out of the housing to accommodate that. Mixed with that variable, there were larger and smaller bearings in the housings. All this creates a matrix of combinations possible for aftermarket axles and subsequent brake kits. Our brake kit is universal for all of these combinations thanks to a set of shims placed between the axle housing bracket and caliper bracket. By offering this as a universal kit for all 8” & 9” Fords we are able to cut the costs of having duplicate kits and are able to produce the components in larger quantities. This makes for a high quality, low-cost disc brake kit.
For ease of installation we mocked up the rotors, calipers, pads, and brackets while the rear axle was being assembled on the workbench and not installed on the Chevelle. The sequence of installing the series of brackets to the rear axle is important and can become confusing. The included instructions diagram this portion of the install well.
The order of plates between the axle bearing/housing out to the wheel flange is as follows: 1/8” thick round spacer plate, C shaped caliper base bracket, 9” bearing retainer plate. Note the 1/8” thick round spacer will have a larger inner diameter than the outer diameter of the axle bearing and will not hold the bearing in place. It merely simulates the thickness of the old drum backing plate for proper spacing and clamp force on the axle bearing. All of these plates have holes in them for 3/8” t-bolts. Some heavier truck 9” housings used ½” bolts. On these axles either use the 3/8” t-bolts or drill out the brackets to accommodate the ½” bolts (I would advise this to be a waste of a ½” drill bit, 3/8” bolts are more than adequate to hold the calipers on and secure the axle).
Now that our base caliper bracket and axle are installed we can mock up our spacing for the main caliper bracket. We mocked the caliper up on the bracket to determine how far away from the face of the bracket the centerline of the brake pads would be. We set the caliper slightly outboard of the center of travel on the slide bolts to accommodate for pad wear. The caliper will travel inward on the slide bolts as the pads wear over time.
Installing the rotor to the axle and securing it with a few lug nuts for mock-up gave us a reference point to measure to. In the end we used two thick spacers and one shim spacer to give us the perfect offset. We removed the rotor and installed our caliper bracket with the shims to the base caliper bracket. We added some loctite on the threads of the bolt and faced all of our hardware to the outside keeping clean bolt heads facing inward where we can see them under the car.
Bleeding Emergency Brake Calipers, Tricks Required!
Assembly of the calipers, pads, lines, and rotors was uneventful and more by muscle memory than instructions. The hurdle that we found ourselves clipping our feet on was in regards to bleeding the GM designed emergency brake calipers. Since there is a spring to return the pads from dragging when the emergency brake cables are released, this spring also backs the pads away from the rotor each time you remove your foot from the brake during bleeding. This causes most of your pedal travel while bleeding to move the same fluid and air back and forth in the lines and caliper without pushing much out of the bleeder.
We removed the return spring from the emergency brake after bleeding the rear calipers too many times (the instructions warned us of this peril, but we were too smart to heed this omen.) We then cycled the emergency brake arm to adjust it up like a ratchet, once we had the pads tight against the rotor we secured the arm with tension forward against it preventing it from losing its adjustment again. This process was repeated on the other side as well. This is a hydraulic system and if we don’t plug both sides our pressure will just move the piston back on the opposite axle end.
Once we had these two calipers properly secured to only accept input from the brake fluid and removed the emergency brake ratchet from the equation they were bled quickly and efficiently. The install of this rear emergency kit can be done quickly and without strife if these steps are followed. Joe and I applied a few specialized vocabulary tricks and extra time with no luck until we slowed down and bled the calipers by the book.
In Conclusion
While not as exciting as a shiny new engine or set of custom wheels, the rear axle is an important part of any car build. As the old saying goes, all the power in the world won't do any good if you can't put it to the ground. This axle and control arm kit will significantly improve the capability of Project Chevelle. Not only that, we no longer have to worry about the embarrassment of roadside (or trackside) breakage.