Micro Sprint Power Steering
Power steering is an everyday part of a sprint car, but for a long time it was unheard of in the micro sprint industry. The biggest challenge that micro sprint drivers face is how to drive a power steering pump off a motorcycle motor and knowing what type of gear to use. The solution? Go electric. With that simple idea, we now have the option to install an electronic power steering unit in almost any micro sprint. In this article, we will go over some benefits of using power steering, as well as how to install it in almost any micro sprint out there. We will also go over a few universal parts one could use for installation.
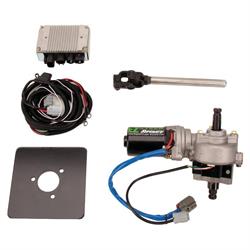
The Stallard Chassis Micro Sprint Power Steering Unit from Speedway Motors, part #960-004, comes as an almost complete package. In the box, you will find the main unit to be mounted just below your dash, the ECU, a mounting plate for universal applications, a u-joint with shaft, and the wiring harness. This power steering unit makes turning the wheel as easy as cutting warm butter. It helps reduce driver fatigue, especially during long races and makes it easier to make those tight turns, such as exiting the track.
Contrary to what many think, the unit is not a “quickener.” It retains the same steering ratio as your rack and pinion. What it does do is reduce resistance in your steering system considerably, making it effortless to turn the steering wheel. This specific unit is the 220 Watt version giving you more resistance reduction than the less expensive 170 Watt versions also on the market. It is best used with frame mounted rack and pinions, but could potentially be modified to work with axle mounted racks given heavy modification to your collapsible steering shaft. However, with its' plug-and-play wiring harness, it’s a breeze to install. With that being said, let’s take a look at some installation tips and parts to get you back behind the wheel in no time!
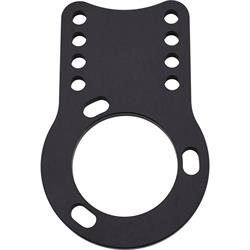
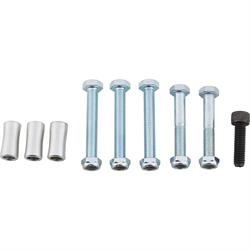
First, you’ll need to mount the power steering unit in your car. Speedway Motors offers a Power Steering Bracket Kit, part #966-27011, made up of two Micro Power Steering Brackets, part #966-27010, and a Micro Power Steering Bolt Kit, part #966-28028. These brackets will bolt directly to the power steering unit, utilizing the 3 long bolts and 3 spacers in the bolt kit. The spacers are 1” long and allow the brackets to fall on either side of the crossbar underneath your dash. The bracket can be adjusted up or down in 1/2” increments, with mount holes that are 2” apart on center. Once the unit is mounted in your dash, the next step is to install the steering shaft between the unit and your rack and pinion.
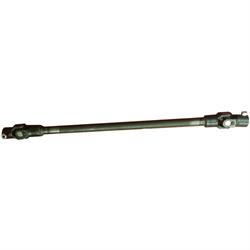
As I said, the unit includes a u-joint with a short shaft already welded on. You may need a longer shaft to make it to your rack and pinion. One option is to use two u-joints and a 3/4” round steering shaft. This would clean up your installation, and negate the need for a coupler on the provided shaft. I have a 2016 Stallard SST chassis, for which Eagle Motorsports, Inc. makes a direct fit Power Micro Sprint Steering Shaft for this car that fits right in, part #966-22808.
To make your own steering shaft, you will need Steering U-Joint, part #960-50637, which fits the power steering unit and allows you to weld the u-joint onto a ¾” round steering shaft. We also offer Steering U-Joint, part #960-50634, which fits the Stallard Rack and Pinion, part #960-002. This can also be welded onto a ¾” round steering shaft. We also offer a multitude of different spline counts and sizes depending on what your rack and pinion requires. Lastly, to finish your steering shaft assembly, we offer the Solid Steel Steering Shaft, part #916-32200. We offer it in various lengths, and you would need to measure for your specific length needed.
Once you’ve got the parts together, you’ll want to install your rack and pinion first, install the u-joints second, then measure and mock up the shaft. After the shaft is cut to the proper length, it will need to be welded to the u-joints. At this point, simply reinstall the new steering shaft assembly onto your power steering unit and rack and pinion. This completes installation of the mechanical side of your steering system. Next we tackle the wiring.
The last thing on the installation list is to mount and wire in your ECU. This can be done rather quickly. The kit comes with metric mounting screws for the ECU. Find a suitable location close to your power steering unit, usually on the ignition tray, and bolt the ECU to it. Once mounted, plug the power steering unit into the ECU. Then take the wiring harness in the kit and plug it into the ECU. This wiring harness has a built-in fuse to protect the unit from electrical surges. This fuse is a standard size and replacements can be sourced locally.
At this point, you will want to make sure your main power switch is turned off. The wiring harness has 3 wires which need to be hooked up. The white wire coming off the harness goes to a switched 12v power source; the black wire goes to the negative battery terminal; and the red wire goes to the positive battery terminal. This kit comes with the electrical connectors needed for most installations. However, if needing larger ring terminals, they can be sourced at your local hardware or auto parts store. Your new electronic power steering system is now complete! All that’s left to do is go racing!