How to Apply LizardSkin Sound Control- 1967 Chevelle
The big push for me this fall was to get the metal work completed before it got too cold in my garage to spray the LizardSkin insulation. As things worked out, I got just that before the weather went south. This was a good place to start stating the parameters that work best for this product. It’s water based, which means it cleans up easily and emits no harmful fumes. It also means that it needs to be fairly warm and dry for it to cure properly. At a minimum it should be 50-55 degrees to spray this product, it was 60 degrees the days I sprayed it. At this temperature it seemed to dry down nice and adhered very well.
Let’s not get ahead of ourselves though, it took a ton of work to get this heap far enough to put the icing on the cake. When I first started tearing into this car I thought it would be cute to strip the rubberized undercoating off the bottom side of it. This was all fine and dandy until I got to the places that were the reason for the thick and nasty undercoating. Fortunately, I didn’t have to strip those places. That metal all got replaced.
Lesson learned. Look closer when you buy a “barn find” chances are there’s probably a reason that pig was stuffed in the barn in the first place. I digress.
I started taking off the undercoat with a putty knife and a wire wheel. By the time I was done, I was ready to have an exorcism performed to get this stuff to release. Needless to say not all of the nooks and crannies got all the tar spatter totally removed, which was okay because I decided to use this product after I’d seen a demo that Marx from LizardSkin did for our video crew.
I had a new plan, no more semi-gloss black painted floor pans. I wanted to coat both sides of the entire floor with sound and heat insulation to get a nice, impervious and sealed coating top and bottom. Not to mention the acoustic and thermal benefits! Of course, I needed a complete floor to spray it on. Cabin area was no sweat, the trunk left a little to be desired.
If you read my last article, you already know the punch line. I won. I got the metal replacement buttoned up, etching primer applied and all the seams sealed up. We were good to go.
Ground rules: Since LizardSkin is water based, you need to seal ALL bare metal surfaces. If you don’t, it WILL flash rust. You’re not off the hook on the new sheet metal either. Any smooth surfaces, like EDP black, will need to be scuffed with Scotch Brite first.
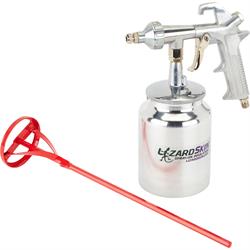
I wiped all the areas to be sprayed with wax & grease remover. The areas that were bare or stubborn undercoat I wiped with lacquer thinner to ensure a good chemical bond and clean physical bite as well. Then, I stirred the product as instructed in the video and setup the gun, which is shown the this video. You can get the Lizardskin Applicator Kit at Speedway Motors, part #91044055. No real magic, just mix with the drill in reverse until uniform. Two turns out on the spray nozzle, 40-60 psi seemed to work best.
Don’t be alarmed when you open the bucket if it looks like half-set concrete. When fully mixed and ready to use, the LizardSkin Sound Control Insulation, part #91044052, (applied first) is the consistency of pancake batter. The LizardSkin Ceramic Thermal Insulation, part #91044050, when fully mixed is about the consistency of cooling cheese dip. It’s thick but light.This brings me to a good point. The thickness and order the coatings are applied is important.
The sound deadener needs applied first to arrest vibration directly at the panel. The heat insulation is applied after the vibration component. Each product, when finished should be two combined coats that total the thickness of a dime. So, a dime thick layer of sound deadener, plus a dime thickness of heat insulation.
I opted to apply product to both sides of the floor sheet metal. So, I applied one coat of each product to the top and bottom with a full dry time between as indicated in the instructions. This did a couple things. It evened out the texture underneath where the old undercoat didn’t come all the way off. It also formed a homogenous barrier to protect the newly healed sheet metal. The application to both top and bottom kept either side from getting too heavy and dulling detail lines in the stampings.
The spray pattern is a little different if you’re used to paint. It is more of a spackle. The “fan” is a circle about 5” in diameter and there’s no cloud of overspray to drift, there is a drop-zone of splatter though. This stuff is tough to remove. It reminds me of a lime scale deposit from hard water. Possibly because I know that it’s water based and I’m surprised by how tenacious it is.
All in all, I’d definitely use it again. I can’t wait to see how it stacks up performance-wise, compared to the peel and stick insulation I’ve used in the past.