Model A Radiator Mounting
Tim keeps on working on his roadster project, this time making sure it keeps its cool no matter how hot it winds up looking. Tim takes a 1932 Ford aluminum radiator and slides it into a Vintique shell, with a little modification.
I am building a little Hot Rod 29 Ford Roadster. The big pieces have all been worked out in my mind starting with an all steel Henry Ford body, deuce rails, ‘54 Dodge Hemi, and quick-change. As I write this I can almost feel the wind in my hair! When I snap out of my dream world the reality in front of me is a big pile of parts which will require time and elbow grease.
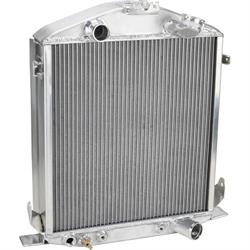
A major component of any vintage car which must be carefully considered is the radiator. Luckily for the modern hot rodder there is a mind boggling array of options when it comes to radiators for the venerable deuce grille shell. While nothing looks the part better than a copper and brass radiator, I am a working Dad with a young family. My wife stays at home and my kids are….well, expensive! To build a hot rod under these conditions can be rough so making a dollar stretch is what it is all about for me. This led me to a relatively new offering from Speedway Motors. They make a really nice aluminum radiator a '32 Ford which is really well built at but at a very affordable price.
The radiators have some important features no note:
- For Chevy engine in a 1932 Ford chassis
- Use with stock height '32 Ford grille shell
- Two rows of 1" furnace brazed cores
- Dummy filler neck in original location
- Includes brackets for radiator support rods
- Built in automatic transmission cooler with 1/8" NPT inlet
- Drain petcock
- 1/2" NPT port at bottom for sending unit
- Stamped upper & lower tanks
- All TIG welded assembly
Having a 29 Ford roadster on deuce rails caused some deliberation about the height I should go with. In the end I chose the stock height radiator to fill the top of my deuce shell fully and take advantage of the largest core possible. To lower the radiator to the proper height and match the cowl I will sink the mounts in my cross member (more on this later). When you pull your radiator out of the box you will notice that you will need to drill all of the mounting holes. This gives you the chance to locate the holes where appropriate. Every chassis is a little different, and whether your grille shell is an original Henry Ford, Brookville, or Vintique, the holes are likely to vary slightly.
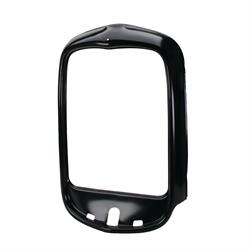
My grill shell happens to be a steel unit purchased from Speedway Motors. It is the original style with the stock cap provision on the top, Speedway part number 911-32164. The shell is very accurate and my original 32 insert fit in perfectly. Before drilling any holes you will want to do some test fitting.
When I first fit my shell over the radiator there was some noticeable interference on the top which was remedied by bending two pieces of aluminum that I am going to call “air deflectors” inward slightly. Once I did this the shell fit well and the dummy neck lined up with the hole nicely.
The radiator has four aluminum mounting tabs where the shell bolts on. These are left long so they can be trimmed. I lined the radiator up in the shell, marked the hole locations, and traced lines where the tabs could be trimmed off.
The tab on the lower right hand side needed a bit more massaging to fit as it was welded on a bit lower than the one on the left. It was nothing a carbide bur on a die-grinder couldn’t fix
In this image above you can see the small half-moon area which needed removal for just the right clearance of the shell stamping. I quickly measured my cross member to find the center to center dimension of the mounting holes. It was right at 19 ¾” so I transferred this measurement to the thick lower tabs of the radiator.
Using a center punch I dimpled the location of each hole, and then drilled them out with a simple hand drill.
Next, to mount the radiator to the frame, I purchased a handy “Radiator Mounting Kit” from Speedway. Part 911-32056 is the kit in polished stainless steel, and there is also a plain steel kit available too, part 911-32055. This kit allows you to mount the radiator just like Henry did, with a spring mechanism to take some of the kinetic energy generated from rough roads away from your fragile radiator.
The kit comes with some rubber gaskets too which mount between the radiator flange and the frame. I added a couple of nylon washers to my installation to keep the spring from digging into my radiator flange.
With the radiator bolted to the frame I installed the grille shell, and bolted everything together. The radiator mounting bolts/springs hide just inside the shell. It is good to note that if you need to gain clearance the aluminum tabs on the radiator can be bent easily.
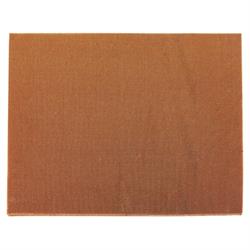
Now that everything is test fit, the next step for me will be to remove the radiator and give it a coat of flat black paint to help it blend in. I am also planning on running a sheet of protective honeycomb material in the front of my radiator. Speedway also has you covered here too! Part 917-34216 is a coated paper honeycomb material originally designed to help circle track racers protect fragile radiators from damaging track debris. It works great on the street too! This will give my radiator an older appearance, but most importantly it will protect it from any damaging rocks or South Dakota sized grasshoppers.
One thing people building Model A’s on deuce rails will ask sometimes is whether or not they should purchase a chopped down radiator knowing the radiator will sit too high in relation to the cowl. The problem with a chopped radiator in this application is that you will have a large gap either on the top between your radiator and shell, or at the bottom. To make use of a larger core size, and fill up the entire shell you can run a full size radiator. You have two choices when the time comes to lower your radiator and shell assembly in your frame.
As this picture shows there is sufficient clearance between the lower tank, and the model A cross member. You can do one of two things in this instance. You can cut the radiator tabs, and have them re-welded to the tank with a step allowing the radiator to sink down into the cross member. I have also seen people cut the radiator mounts from their cross member and lower them to allow the radiator to remain unchanged. I will tackle this later, once I have the body mounted and at the final height. This picture also shows the location of the trans cooler ports, petcock, and coolant temp sensor bung. Once I get my little 241 back from the machine shop I have no doubt this radiator will do a great job keeping it cool. I would highly recommend this radiator to anyone needing a nice piece for a great price!