32 Grille Repair
Speedway Motors employee Tim M. takes us along as he tackles yet another project. This time Tim is saving an original 1932 Grille insert from the scrap man, and giving it new life as the first thing you see on his '28 Ford project.
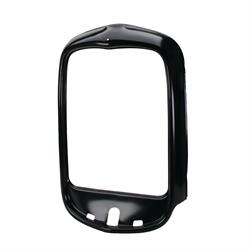
Every part on a hot rod has a story. The builder becomes deeply connected with his creation when he or she knows the history behind the parts. All of the stories combine in the finished car and it becomes a unique narrative. I am working on a 28 Ford Roadster that I hope can be a great collection of stories and history that will equal more than the sum of its components. Knowing this I have sought out special pieces for my build that have meaning to me. On an old hot rod nothing is as much a focal point as the grille. I knew for my 50’s period roadster I wanted to run a deuce grille, because to me nothing looks better.
Because the grille is such an important part of the car visually I wanted to use great care in which pieces to select. Recently I had a chance to pick up a major piece of the puzzle. A few months ago I leaned that a good family friend had passed away. I was really sad thinking about the loss as I knew this man throughout my childhood all the way back to some of my earliest memories. I was 5 years old when he would continuously torture me with giant South Dakota grasshoppers, sticking the largest ones he could find in my nose and ears in an attempt to be funny. Needless to say it scarred me for life because I have a phobia of grasshoppers to this day. This friend also had a love for old Fords and 5 weeks ago his estate was auctioned off.
Along with a really nice deuce 3 window coupe, sedan, and other vehicles he also had piles of parts collected over the years. I was in no position to purchase the cars but had my eye on some of the parts. As luck would have it I spotted an original Deuce grille insert lying in a pile of other grilles. Perfect! I had to have it and after some repetitive waiving of my hand I outbid everyone else there. The price seemed reasonable because this insert was more to me than a part; it was a piece of my friend.
After winning the auction I carried it around with pride for the rest of the day. I purchased some other parts too, but couldn’t wait to get my battered insert home to start working on it. To some it might look really rough. Many of the bars were bent and two were completely gone. Worst of all, it had a really bad dent on the top which deformed it popping the stainless trim off on one corner.
I could now get to work straightening out my insert. First, knowing I was short a couple of grille bars I called an industry partner to order some replacement bars. They offered them both in mild steel, and stainless. I wanted to be as close to original as possible, so I opted for two of their steel bars. These are nice because they are truly raw steel and not zinc plated like others available. They also have the proper profile, and are a bargain at a couple bucks each. More on these later!
To see how far away I was from having the proper fit I put the insert up to the shell. It wouldn’t come close to slipping into place, so before I put any pressure on it making things worse, I decided to tackle the big elephant in the room….the nasty dent on the top.
To address the dent I would have to do some slight disassembly of the insert because there three layers of metal affected. First the decorative stainless outside which is crimped onto the steel frame had to be pulled off. My insert was hit hard enough that it was pulled away at the damaged area already. But to get good access I pulled it off a bit more without removing it completely.
Now I could assess the damage to the steel underneath. It was pretty significant, and I could tell the metal was stretched enough that it would take patience to bring it back.
To get behind the dent there is a third layer that I will call a “comb section” that aligns the grille bars. For this particular fix I didn’t see any other way but to remove a small portion of this area to really work the dent out. Using a small cutter I removed a 1” section, just enough to expose the other side of the dent.
No one really makes a kit for hammering out 32 inserts so I had to make some tools of my own. I found some old hand tools designed for working with clay. I broke the ends off, and used the hard wood handles for soft punches. I carefully filed the wood handles to match the profile of the areas that would be hammered out.
I went to work using my leg for a bench and gently tapped the dent in the stainless out. It took some good whacks go get the metal moving in the right direction, but if you do this be careful as too much force can create more damage!
While there are guys out there that can make dented stainless like this finish out as if nothing had ever happened to it. I am not that skilled, and while it may sound strange I wanted to leave a reminder that the dent had been there. Knowing this I tapped it out until it was mostly gone.
Next I took on the steel frame where the stainless clamps on. Because the dent was so pronounced and deep, I drilled a small hole in the middle of it hoping it would allow the metal to shrink more easily.
After the hole was drilled I went to work with my second wood tool/chisel and gently tapped it out. This time I used a flat steel dolly on the opposite side. It came out relatively easily but I could still see a pronounced bow in the frame on the side of the dent. Using a flat piece of wood as a straight edge I pressed it by hand using my body weight to bring it back into shape. These inserts are fairly soft, so manipulating them into place doesn’t take much force.
Feeling like the insert was back to its original shape, I tried it in the insert again. As I hoped it was a snug fit, but it popped right in!
Now I turned my attention to the grille bars themselves. Many were bent, but I wanted to keep all of the original bars if possible. Most of the straightening was just a matter of careful looking, and hand pressure. If you have ever bent a paperclip until it was perfectly straight you can do this! Again the important thing is to just use a little force and make adjustments little by little. For sharp or pronounced bends a flat gasket scraper is a great tool for working from behind the bars. The scraper acts as a guide and fits perfectly into the back groove of each grille bar.
I was now pretty happy with the way things were looking. Here it is mocked up on the car, still with two bars missing.
I didn’t want to paint them one color before installing worried they would stick out like a sore thumb.Instead I would try to re-create the patina on the original bars.
First I painted both bars flat black to act as my blank canvas for the color. I stopped by a local surplus store that sells partial cans of paint for cheap. They had some colors that would help so I scooped them up.
While there is no substitute for age, I think I got them close. Flat colors layered seemed to work best.
Once the bars were painted, I carefully wiggled them into place. Once nestled into their long term home, I welded in the little piece of “comb” structure back in place. It holds the new bars in place perfectly.
The reproduction shells are not drilled for the insert, so I carefully marked the holes, and drilled holes as needed. Here she is ready to see the road again. Now when I look at my car it will be easy to remember my old friend. As you can see, this is just the beginning of getting my old roadster back on the road!